Devices play a crucial role in establishing connectivity between your NOCs (Network Operations Centers), PoP sites (Point of Presence), subscriber sites, and standalone sites. In the Wispgate system, four distinct types of devices can be added and managed.
Devices’ Dashboard explained:

- Marked 1: The illustration showcases the wide range of devices that can be integrated into your network. It includes different categories such as NAS devices, Network Devices, Subscriber Devices, and Standalone Devices. Each category displays the number of devices added within that specific category. To explore the devices within a particular category, simply click on the category name to reveal the complete list of devices within that category.
- Marked 2: Provides an aggregation of all the devices spanning across the different categories of devices
- Marked 3: Provides an aggregation of all the currently online (active) devices across the different categories.
- Marked 4: Provides an aggregation of all the currently offline (inactive) devices across the different categories.
- Marked 5: Shows all the devices that have been discovered.
NAS Devices:
These devices are known as Network Access Server devices, offering a range of RADIUS capabilities and services such as PPP (PPPoE, other PPP protocols) and DHCP authentication, QoS, and more. NAS devices can be utilized in the following capacities:
A. Sharper: When a NAS device serves as a Sharper, it takes responsibility for managing QoS (Quality of Service) and all aspects related to queues.
B. Service Provider: If the NAS device is configured as a Service Provider device, it offers services such as PPP (PPPoE, other PPP protocols), oVPN, and DHCP authentication to subscribers.
C. NAT Provider: When the NAS device operates as a NAT Provider, it provides Network Address Translation (NAT) services.
D. Hotspot: If the NAS device is designated as a Hotspot device, it functions as a hotspot manager, handling all aspects of hotspot subscriptions.
Please note that you have the flexibility to configure a single NAS device to serve as a Sharper, NAT provider, Service Provider, and Hotspot simultaneously. Alternatively, you can choose to configure separate devices for each specific service. The configuration approach can be tailored according to your specific requirements
To configure a device as a NAS Device:
- Click the Add Device button to begin adding devices
- Fields marked yellow are mandatory (*)
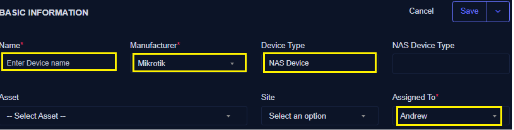
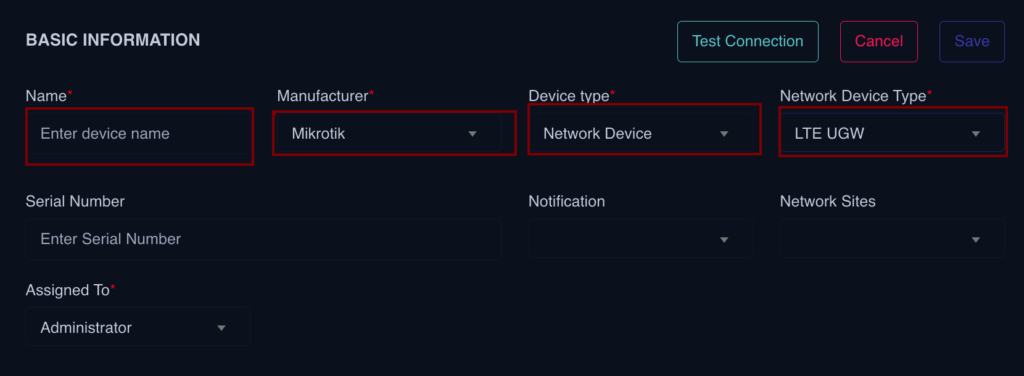
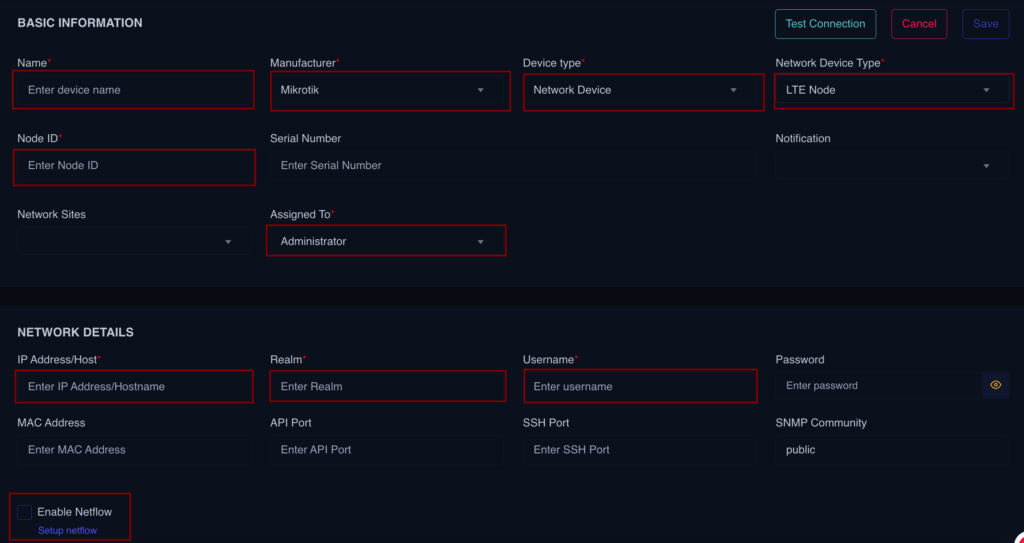
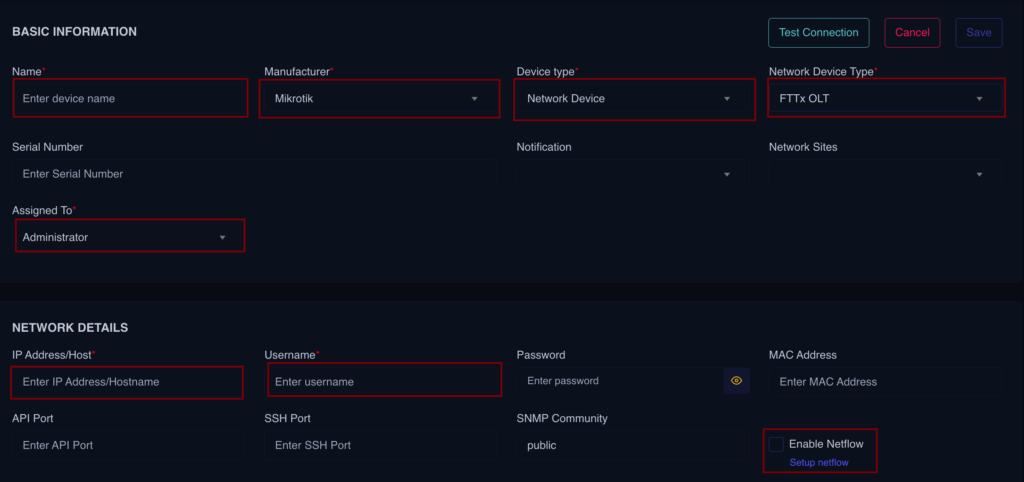
Basic Information:
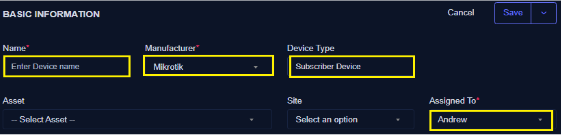
- Enter device name (*)
- Select device manufacturer (*)
- Select NAS as the device type
- Select Asset (assets are the devices that are utilized to support network operations and enable connectivity)
- Select desired site
- Assign the device (*)
Selecting Device Types:
You may select a particular device type based on your requirement, if your network supports it and what you intend to achieve.
- LTE UGW (Universal Gateway) LTE UGW is a core network element in LTE architecture that manages data traffic and user connections. If used properly, it will handle user sessions, mobility, and service continuity in LTE networks while allowing users to surf at greater speeds.
- LTE Node It is a key network component in LTE that connects mobile devices to the network. It processes data traffic, signaling, and manages network access for user equipment (UE).
- FTTx OLT (Optical Line Terminal) It serves as the main distribution point in FTTx (Fiber to the X) networks. It connects to the fiber optic backbone and serves as a hub for delivering broadband services to multiple customers.
- FTTx ODB (Optical Distribution Box) Consider this a termination point in FTTx networks where optical fibers are split and distributed to individual customer premises. It enables the connection between the OLT and end-user devices.
Network Details

- Select management subnet (create management subnets from the IPAM). This subnet is used to manage devices across your network.
- Add address for the host/device () Add username () (ensure that the username on the device matches the username specified within the system otherwise, there will connectivity issue).
- Add device password (this is not mandatory but recommended) to ensure that the password is exactly what is configured on the specific device. Double-check for proper configuration.
- Add the device MAC address (not mandatory)
- Add Secure Shell Port number (not mandatory)
- Add SNMP (Simple Network Management Protocol) You can add public or private
- Specific to the WAN interface or WAN IP).
Statistics:
The complete statistics of the device, once it is online and active, will be displayed in this section. This includes relevant information such as device model, CPU usage, device uptime, etc.

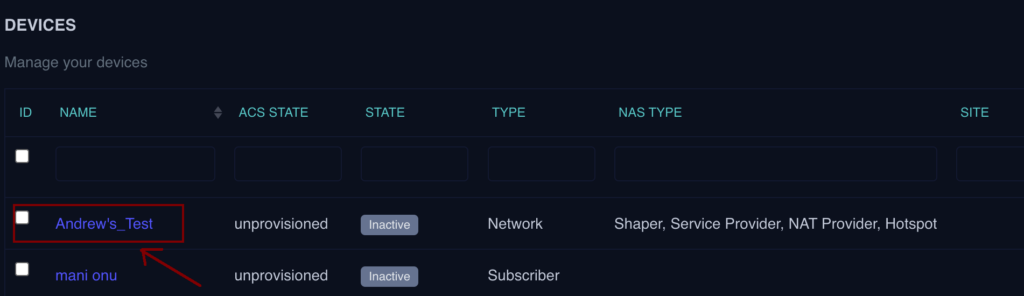
Device Inner Page:
The inner page of the device provides detailed information about each added device. You can access various features, including hotspot location, hotspot login simulation, and other essential data. To access a device inner page, click on the specific device as show.

Summary: The summary tab presents key device details, including its name, manufacturer, device type, associated IP address, username and password, device activities, and touchpoint. Additionally, you have the option to add comments in the comment section.

Hotspot Pages: This tab allows you to view, edit, and add hotspot pages that will impact the specific device. The total number of hotspot pages available are displayed on the tab.

To add a Hotspot page:
- Click the Add Hotspot Page button
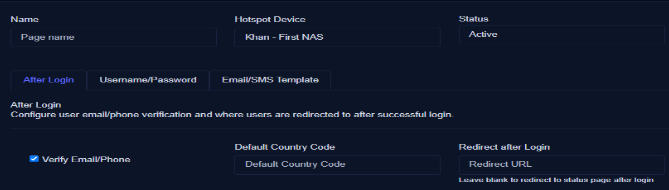
After Login: User email if (Verify Email/Phone) checkbox is checked, the email/phone that the customers provided will ve verified. Set a default country code for all the phone numbers that would be provided by the customers. Enter a link that customers will be redirected to when logged in.
Username and password: Create customer login details here.
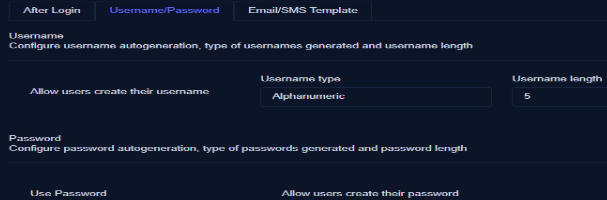
Click the Allow users to create their usernames if the users will be creating their specific usernames. However, you can set the allow username tags and an API URL to verify the username, otherwise, set username type to Alphanumeric and set the username length. Under this configuration, users will be allowed to create their own passwords.
Email/SMS Template Set your email subject set SMS Template Utilize the format section for desire formatting
Hotspot Settings: Under this tab, you can view, modify, and add new hotspot settings. The total number of hotspot settings are visible on the tab.
- To create a Hotspot Setting, click the Add Hotspot Setting button
- Enter the setting name
- Hotspot device should appear automatically
- Select the language that the portal should be displayed in.
- Enter desire settings as per the availability
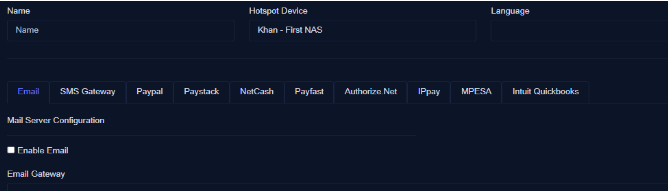
Hotspot Vouchers: Hotspot vouchers are designed for customer use and require careful creation. In this tab, you can view, edit, and create as many vouchers as needed for the device
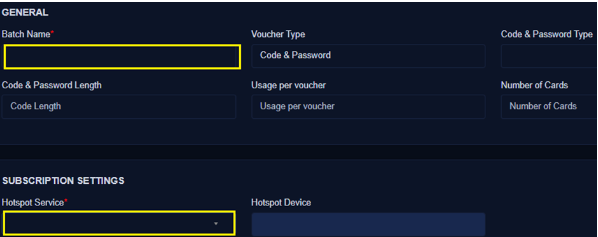
- To create vouchers, click the Add Hotspot Voucher Batch button
- Enter voucher batch name select Voucher type as (“Code only” or “Code and Password”)
- Enter Code and password length
- Enter usage per voucher. The number of times each voucher can be used.
- Enter the number of cards that should be produced for the specific voucher
- Select the Hotspot Service
NAS Router configuration:
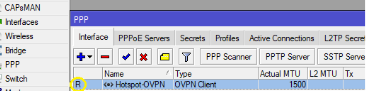
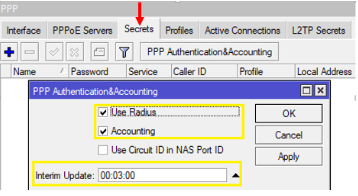
To configure your MikroTik router as a NAS Device, follow these steps: Ensure your OVPN is running
Configure RADIUS Server as shown (Check PPP, Hotspot, and DHCP)
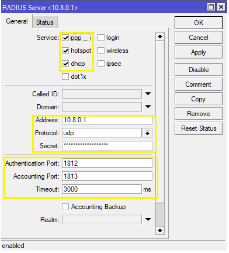
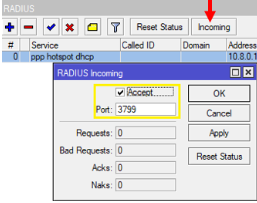
- Set RADIUS Incoming as shown
- Ensure Accept checkbox is checked
- Consider the port number
Create PPPoE Server

Ensure the PPPoE Server is running as follows

Ensure secret is configured as shown
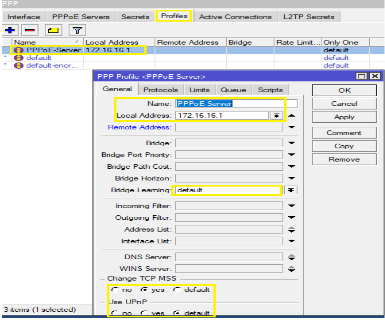
Create PPP profile(s)
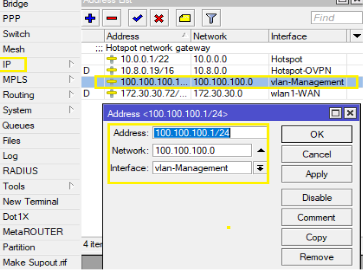
Create Management subnet
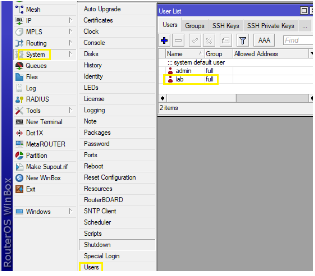
If desired, you may create a different user and password with full permission
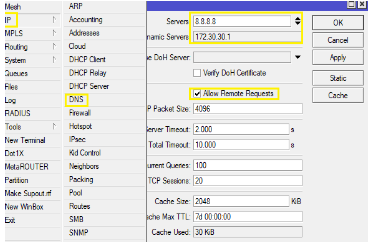
Ensure DNS is configured
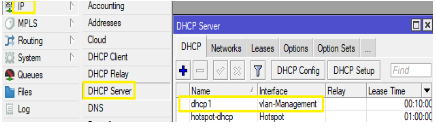
Ensure Management DHCP server is up and running:
Subscriber Device:
Subscriber Devices are the devices installed at the customer’s premises, which are managed and supervised by you. These devices are equipped with PPPoE and DHCP functionality, enabling connectivity and management through the designated management subnet.
To create a Subscriber Device:
- Enter device name (*)
- Select device manufacturer (*)
- Select NAS as the device type
- Select Asset (assets are the devices that are utilized to support network operations and enable connectivity)
- Select desired site
- Assign the device (*)
Network Details:

- Select the management subnet (create management subnets from the IPAM). This subnet is used to manage devices across your network.
- Add an address for the host/device (*)
- Add username (*) (ensure that the username on the device matches the username specified within the system otherwise, there will connectivity issue).
- Add device password (this is not mandatory but recommended) to ensure that the password is exactly what is configured on the specific device. Double-check for proper configuration.
- Add the device MAC address (not mandatory)
- Add Secure Shell Port number (not mandatory)
- Add SNMP (Simple Network Management Protocol) You can add public or private
- Specific to the WAN interface or WAN IP).
Statistics:
The complete statistics of the device, once it is online and active, will be displayed in this section. This includes relevant information such as device model, CPU usage, device uptime, etc.

Subscriber Router configuration:
To configure your MikroTik router as a subscriber device, follow these steps:
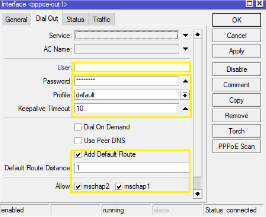
Create a PPPoE Client

- Ensure the PPPoE client is configured as shown.
- Enter username and password from NAS Router and the checkboxes as shown
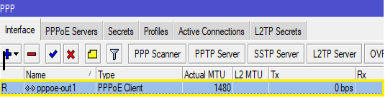
Ensure the PPPoE client is running
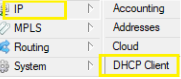
Receive IP via the DHCP client
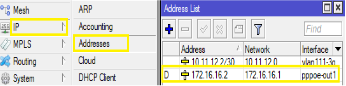
Check that the device has received IP from NAS Router
This process can be done for a Network Device and Standalone Devices
Note: We demonstrate the subscriber device setup on the MikroTik platform, but it’s not necessarily needed to be a MikroTik as any IP-based modem/Router would be supported as a subscriber device.
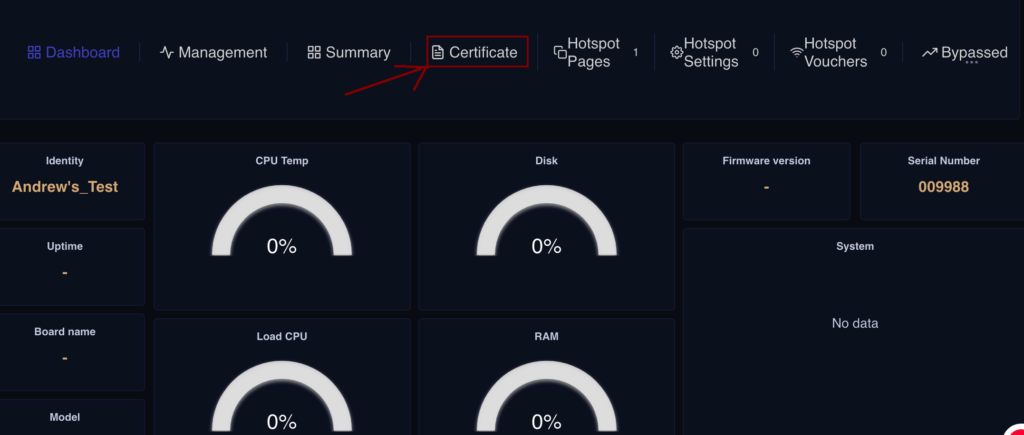
Certificate Management
This certificate confirms the successful configuration and deployment of a NAS device as part of the your CRM and billing system. The NAS device would play a crucial role in managing and authenticating users access to the network, ensuring smooth internet connectivity and accurate billing.
Uplloading Certificate
- In the list of Devices, select a paticular
- It takes you to the Device Inner page
- The required Certificate