Traffic shaping is a crucial technique used in computer networking to manage and control the flow of network traffic. It involves prioritizing and regulating the transmission of data packets to optimize network performance and ensure fair distribution of bandwidth among users or applications.
The primary goal of traffic shaping is to shape network traffic according to predefined policies and rules. By controlling the bandwidth allocated to different types of traffic, ISPs can prioritize critical applications or services while limiting the impact of non-essential or bandwidth-intensive activities. This helps maintain a consistent quality of service (QoS) for users and prevents congestion or network bottlenecks.
Traffic shaping can be implemented through various mechanisms, such as packet scheduling algorithms, queuing disciplines, and bandwidth allocation techniques. These mechanisms enable network administrators to define traffic priorities, set bandwidth limits, and establish traffic classification rules based on factors like source, destination, protocol, or application.
In WISPGate, you have the ability to create and oversee your Quality of Service (QoS) settings, ranging from individual packages and QoS groups to smoothly switching between different QoS modes.
Traffic & Packages Create many different packages and assign them to your customers. Under Traffic & Packages, you can create the following packages:
A. Dedicated Packages Dedicated packages” as the name suggests, are packages that are specifically assigned or allocated for a particular purpose or use for a customer.
To understand the concepts of dedicated packages,
- Parent: Parent setting is not required, as users will remain without parent.
- Rates: would be taken as the User Committed Information Rate (CIR) = User Maximum information Rate (MIR)
- CIR (Committed Information Rate) worst case scenario, flow will get this amount of traffic rate regardless of other traffic flows. At any given time, the bandwidth should not fall below this committed rate.
- MIR (Maximum Information Rate) – best case scenario, maximum available data rate for flow, if there is free any part of bandwidth
- Queue type: Queue Type is based on the First-In First-Out (FIFO)
- Queue Table: This is based on a Simple Queue
- Traffic Recognition: The specific IP address of the user device. By login and logout conditions, the user IP will be added or removed from the simple queue table.
Creating Dedicated Package
- Select the Traffic & Packages
- Click the Add Package
- Enter the Package Name (*)
- Status: Select Active or Inactive
- Set Speed Plan to Yes

Data Plan set to No otherwise set to Yes to enter Set to Bidirectional to indicate that the data will be used for both download and upload
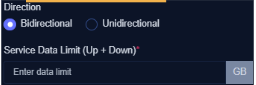
Set to Unidrectional

Save entry once done.
Shared Packages
These packages are accessed by multiple users or devices. There can be many ways to manipulate how the shared package should work. Consider a simple Shared Package configuration.
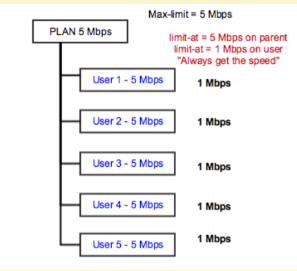
To understand how the shared package world, let’s consider the following: We are offering a 5 Mbps plan to customers, which operates on a sharing ratio of 1:5. This means that WISPGate will designate the parent MIR (Minimum Information Rate) as 5 Mbps. Under this parent rate, it will allocate 5 users, each with an individual MIR of 5 Mbps. When the network is not congested and only one user is downloading/uploading, that user will be able to utilize the full 5 Mbps throughput.
However, if a second user starts actively downloading, both users will receive a reduced speed of 2.5 Mbps each. The bandwidth will be shared equally between the two users. In the scenario where all 5 users are downloading simultaneously, they will divide the parent queue’s bandwidth, and each user will receive a minimum speed of 1 Mbps (CIR – Committed Information Rate) to ensure they meet their required minimum speed. Flow Diagram of auto-sharing.
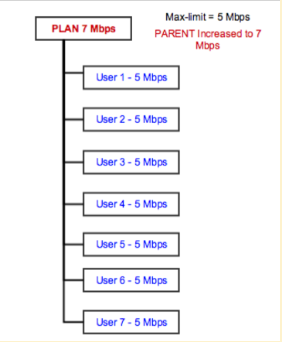
In the situation where 7 users are put on a 1:5 ratio plan, WISPGate will automatically change the parent MIR to 7 Mbps, leaving the MIR of each user at 5 Mbps. The process is explained in the diagram below.
Keep in mind:
- For auto-sharing, parent queues will be generated dynamically, requiring only to define the desired ratio. As a result, the CIR and MIR fields under the auto-sharing page can be omitted.
- The parent queue type will be set as PCQ, while the child queue type will be set as FIFO. To manage the traffic, we will utilize a Simple Queue as the Queue Table, and IP addresses will be used for traffic recognition.
- As users log in and log out, their respective IP addresses will be added to or removed from both the parent and child queues accordingly.
Creating Shared Package
- Click the Add Package button
- From the list, Package Type select Shared Package
- Enter the Package Name (*)
- Fill all required fields

Manual Sharing:
When creating a subscription, both the package and the parent group will be selected manually. However, during the definition of the package and group, it is essential to display only those groups that can accommodate the package based on the CIR and MIR values of the children and parents.
To ensure this, the system should only show available parents/groups that have a MIR equal to or greater than the selected package’s MIR. Additionally, caution should be taken to avoid adding more users to a parent if the aggregation of all children’s CIRs will exceed the Parent MIR.
To meet this requirement, the following conditions should be adhered to:
- The sum of each user’s CIR (Customer Information Rate) within a parent should be less than or equal to the Parent MIR.
- Each individual user’s MIR should be less than or equal to the Parent MIR.
In essence, the manual sharing process and logic will mirror the auto-sharing process. However, in manual sharing, the WISPGate Operator will place children under a parent manually. The same logic, rules, and conditions will be followed, ensuring that grouping customers is done efficiently, as exemplified by grouping all tenants of a 5-floor building under one parent for an ISP owner.
The setup for the network’s traffic management is as follows:
- Parent queue type: PCQ
- Child queue type: FIFO
- Queue Table: Simple Queue
- Traffic Recognition: IP address
Whenever a user logs in or logs out, the system will automatically add or remove the user’s IP address from both the parent and child queues. This way, the network can efficiently manage and prioritize the traffic for each user based on their IP address. The PCQ (Per Connection Queue) will be used for the parent queue to allocate bandwidth among users, and the FIFO (First In, First Out) will be used for the child queue to ensure proper queuing of traffic. The Simple Queue will be utilized as the Queue Table to store the necessary information about each user’s connection and ensure effective traffic control based on their IP addresses.
Auto Sharing Auto sharing (if set to Byes) would allow the package to be shared amongst multiple users or devices. Burst Plan (if set to Yes) The Burst feature allows for the fulfillment of additional bandwidth requirements in a queue, even if the required rate exceeds the maximum limit (MIR) for a limited period of time.
- Burst can only occur if the average rate of the queue over the past burst-time seconds is lower than the burst threshold. Burst will cease if the average rate of the queue over the past burst-time seconds is equal to or greater than the burst threshold.
The Burst mechanism operates as follows: when the burst is permitted, the max-limit value is replaced by the burst-limit value. When the burst is not allowed, the max-limit value remains unchanged. Reference https://wiki.mikrotik.com/wiki/Manual:Queues_-_Burst
Bundled Package The Bundled Package combines multiple existing Queues (QoS) to create a customized bundle that aligns with the customer’s specific requirements or related needs.
Creating Bundled Package
- Click the Add Package button
- From the list of Package Type, select Bundled
- Enter the Package Name (*)
- Fill all required fields

Bundled Packages -Dynamic Mode:
The bundled package can be used in dynamic mode, as it offers a wide range of features that allow for customizing data usage based on different days of the week. It allows you to specify specific start and end times on particular dates. Additionally, the bundled package can be utilized for marketing purposes to meet your customers’ needs.
Creating bundled packages:
- Navigate to QOS Mode
- Click the Add button
- Enter bundled package name
- Select Status: Active or Inactive
- Set QOS MODE to Dynamic
- Check the specific dates and indicate the time as required.

Top-up Recharge
Top-Up packages are utilized to add credit or increase the value of a customer’s existing plan or prepaid data plan. They provide individuals with the means to replenish their data balance, guaranteeing uninterrupted communication and access to a wide array of services.
Creating a Top-up package
- Click the Add Package button
- From the list Package Type select Top-Up Recharge
- Enter the Package Name (*)
- Fill all required fields

Save once done.
Hotspot Package
The Hotspot packages are specifically designed, managed, and intended for the use of hotspot services. These packages are primarily dedicated to catering to the needs of hotspot users (customers).
Creating Hotspot packages
- Click the Add Package button
- From the list, Package Type select Hotspot Package
- Enter the Package Name (*)
- Fill all required fields
- Time Allocation allows you to add the package expiration in minutes
- Device Limit = this is the max devices the package can be used across.
- Speed Throtte = allow for the speed to be increased or decreased.
- Current Device = specific how many devices can use this package simultaneously.
- KeepAlive Time = once set, it allows the device to continue to surf after the data plan is exhausted.

Management Packages:
Management packages are designed with a specific focus on management purposes. These packages are implemented when there is a need to execute certain functions or address issues that may arise, such as disconnections. The management packages serve as a temporary solution until the issues are resolved.
Creating Management Packages
- Click the Add Package button
- From the list Package Type select Management Package
- Enter the Package Name (*)
- Fill all required fields

Save entry once done
LTE Packages
LTE Packages are designed to provide high-speed wireless internet access using 4G LTE technology. These packages are ideal in areas where fiber or traditional broadband connections may not be available or feasible. LTE packages serve as a flexible and reliable solution for both residential and business users who require stable connectivity for daily operations.
They are especially useful in scenarios where quick deployment, mobility, or backup internet is needed. LTE packages can be activated or adjusted based on user demand, offering an adaptable option until a more permanent internet solution is in place.
Creating LTE Packages
- Click the Add Package button
- From the list Package Type select LET Package
- Enter the Package Name (*)
- Fill all required fields
- Save it

QoS Group:
QoS Group, short for Quality of Service Group, is a crucial aspect of network management that allows for efficient control and prioritization of network traffic. It provides a means to categorize and manage different types of data flows based on their specific requirements and priorities.
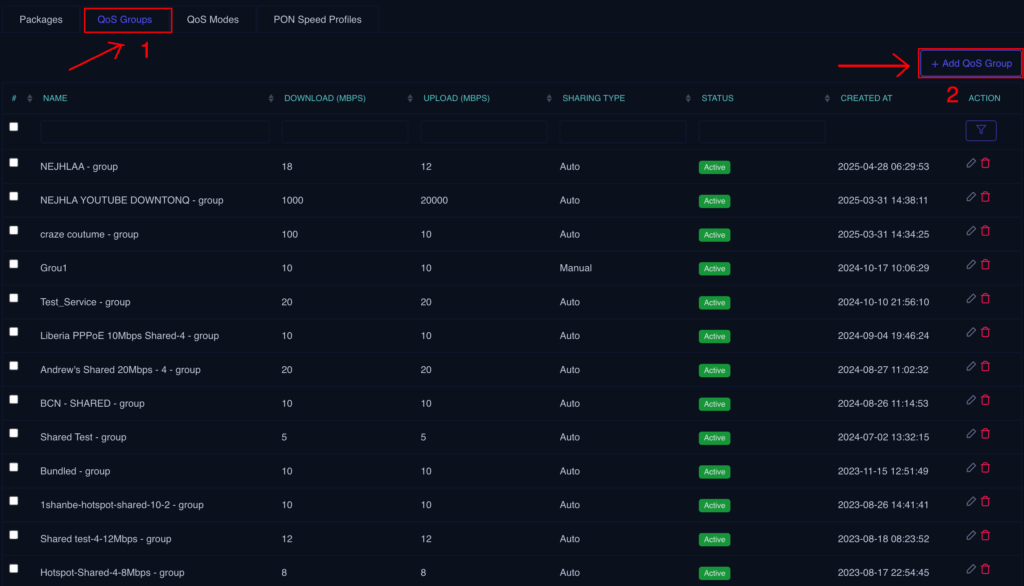
Create QoS Groups: _ Click the Add QoS Group button
- Click the Add QoS Group button
- Enter the Package Name (*)
- Fill all required fields
- Set Status to Active
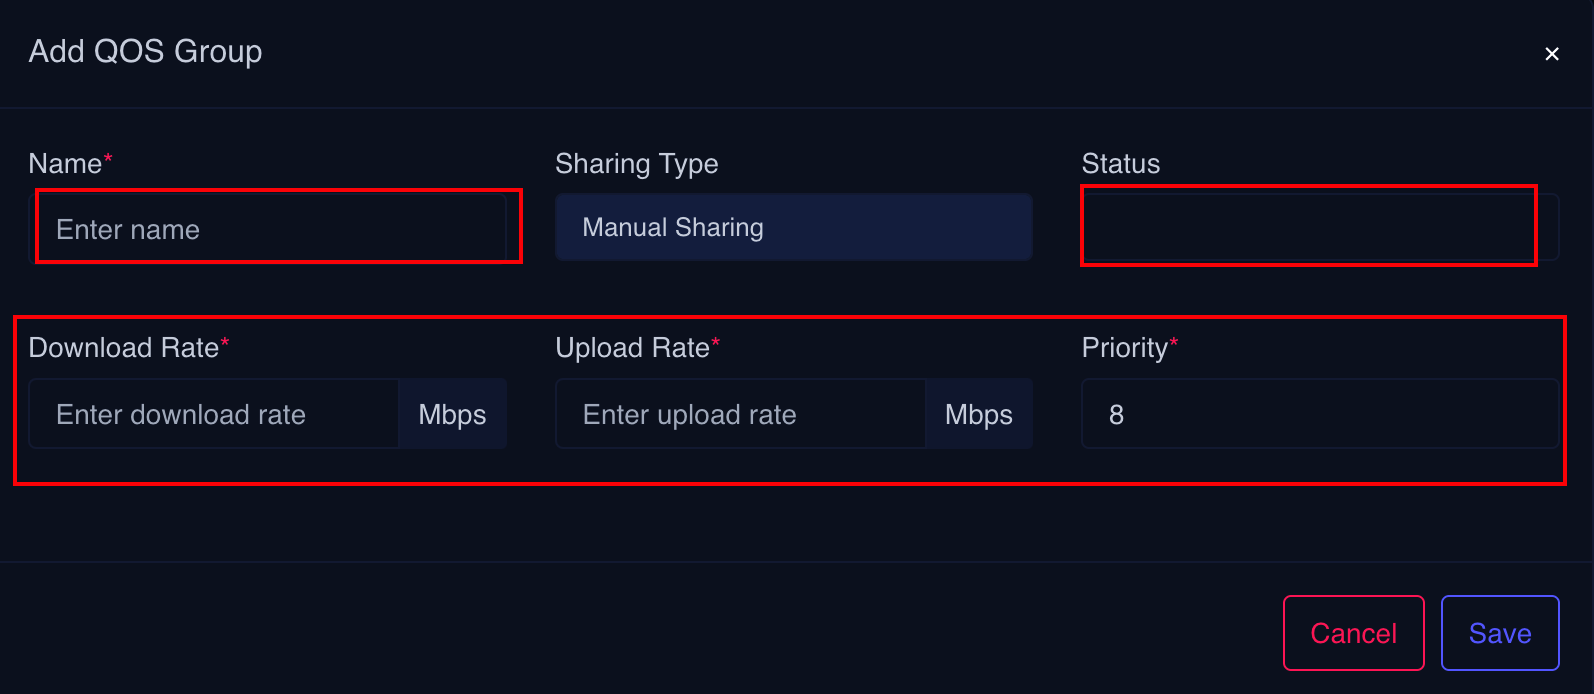
Priority = highest priority is 1 while low priority is set to 8
QoS Mode
QoS modes are specifically designed to effectively manage your internet connectivity, particularly in scenarios where you have multiple upstream (service providers).
In WISPGate, there are three primary modes of QoS:
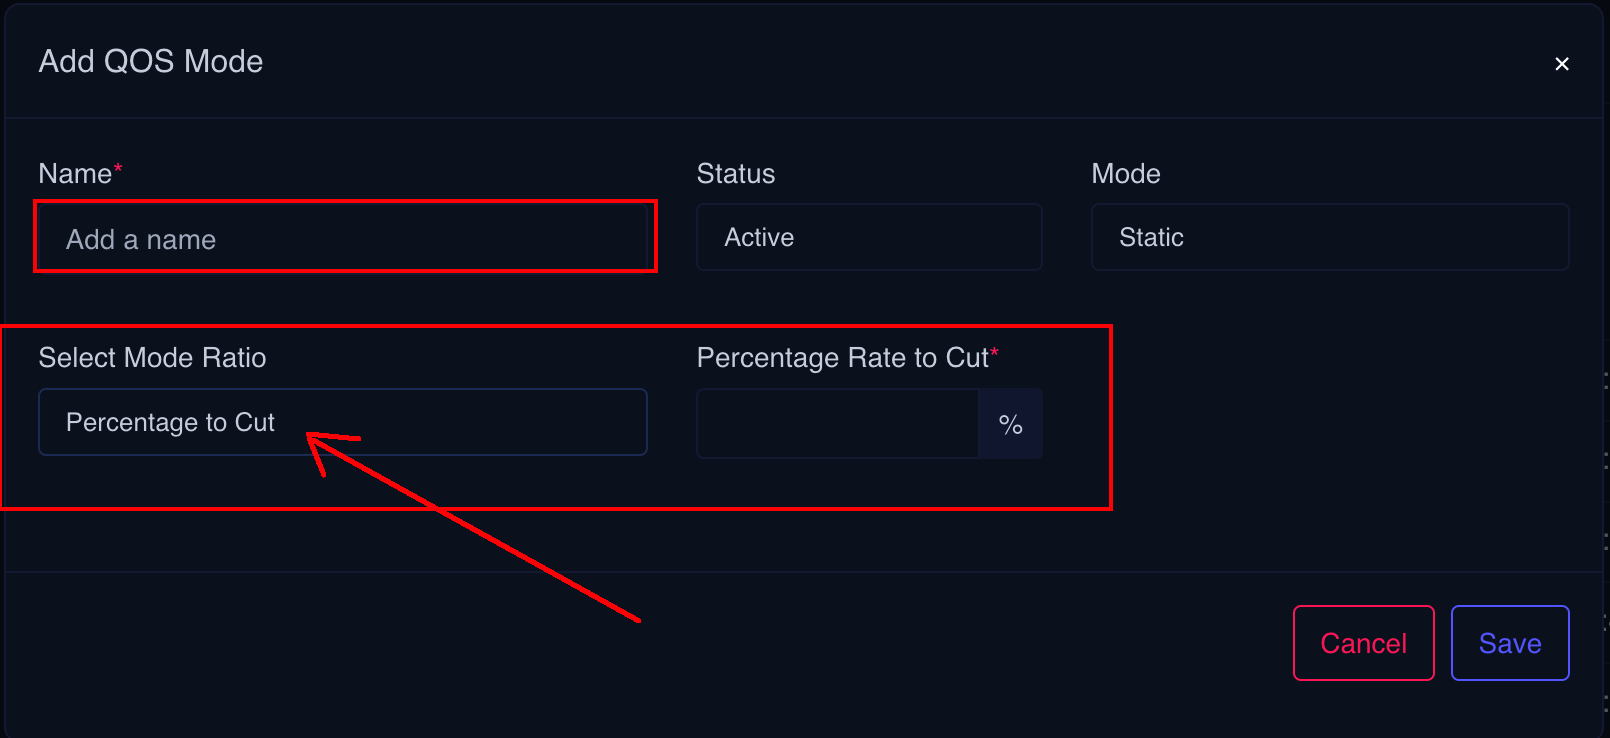
Percentage to Cut: This mode allows you to allocate data across your total received plan from the upstream service providers. For instance, if you have two upstreams and one of them experiences an outage, you can utilize this mode to cut a certain percentage (e.g., 50%) in order to fairly serve all your customers with the available service.
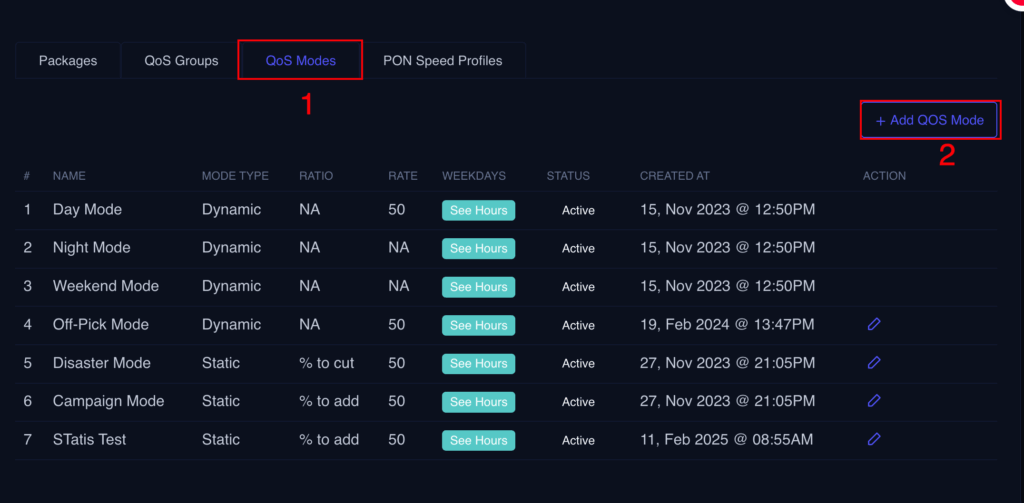
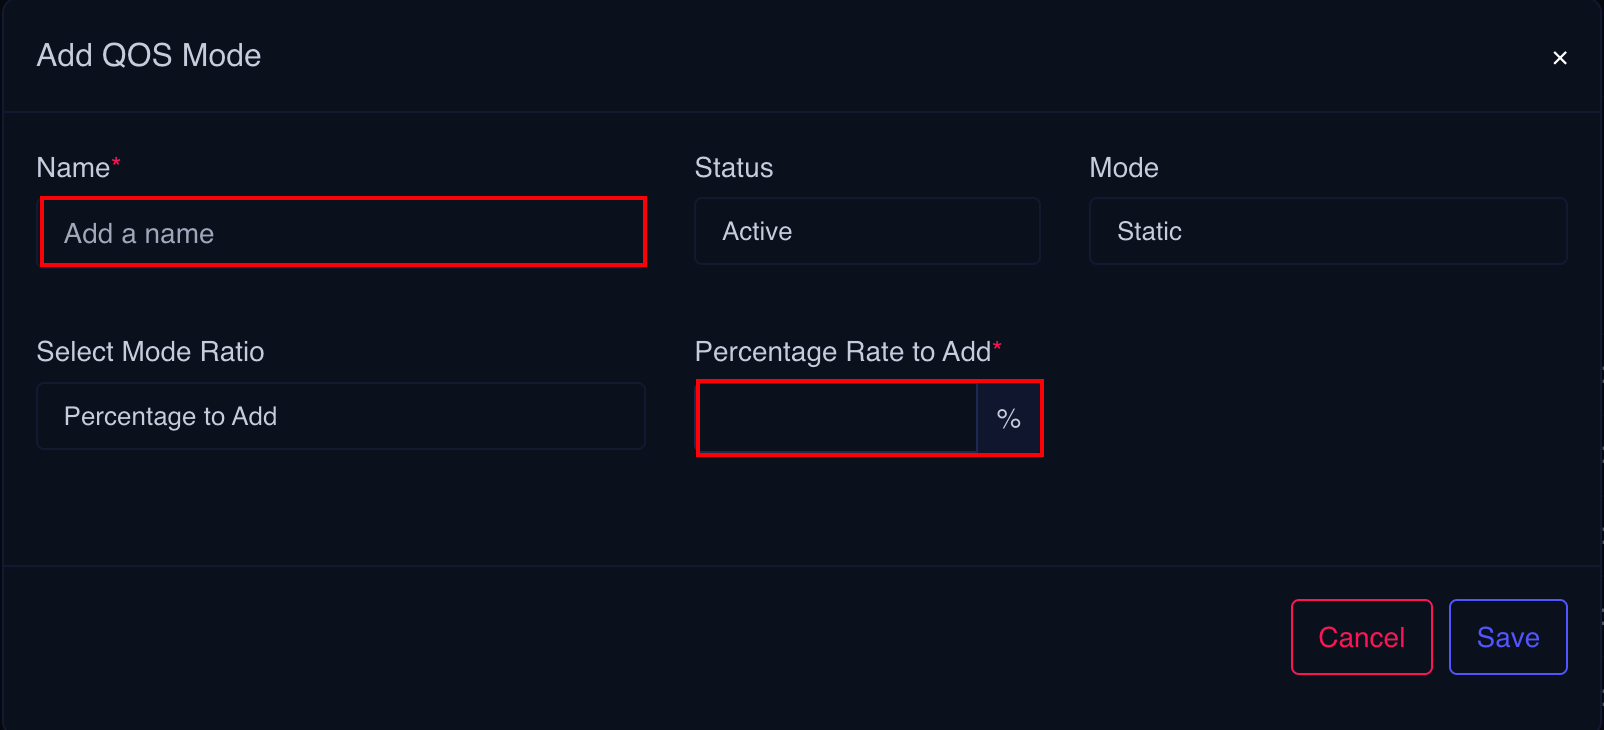
Create a simple Percentage to Cut
- Click Add under the QoS Modes
- Enter QoS Mode
- Set Mode to Static
- Select the Mode Ratio to Percentage to Cut
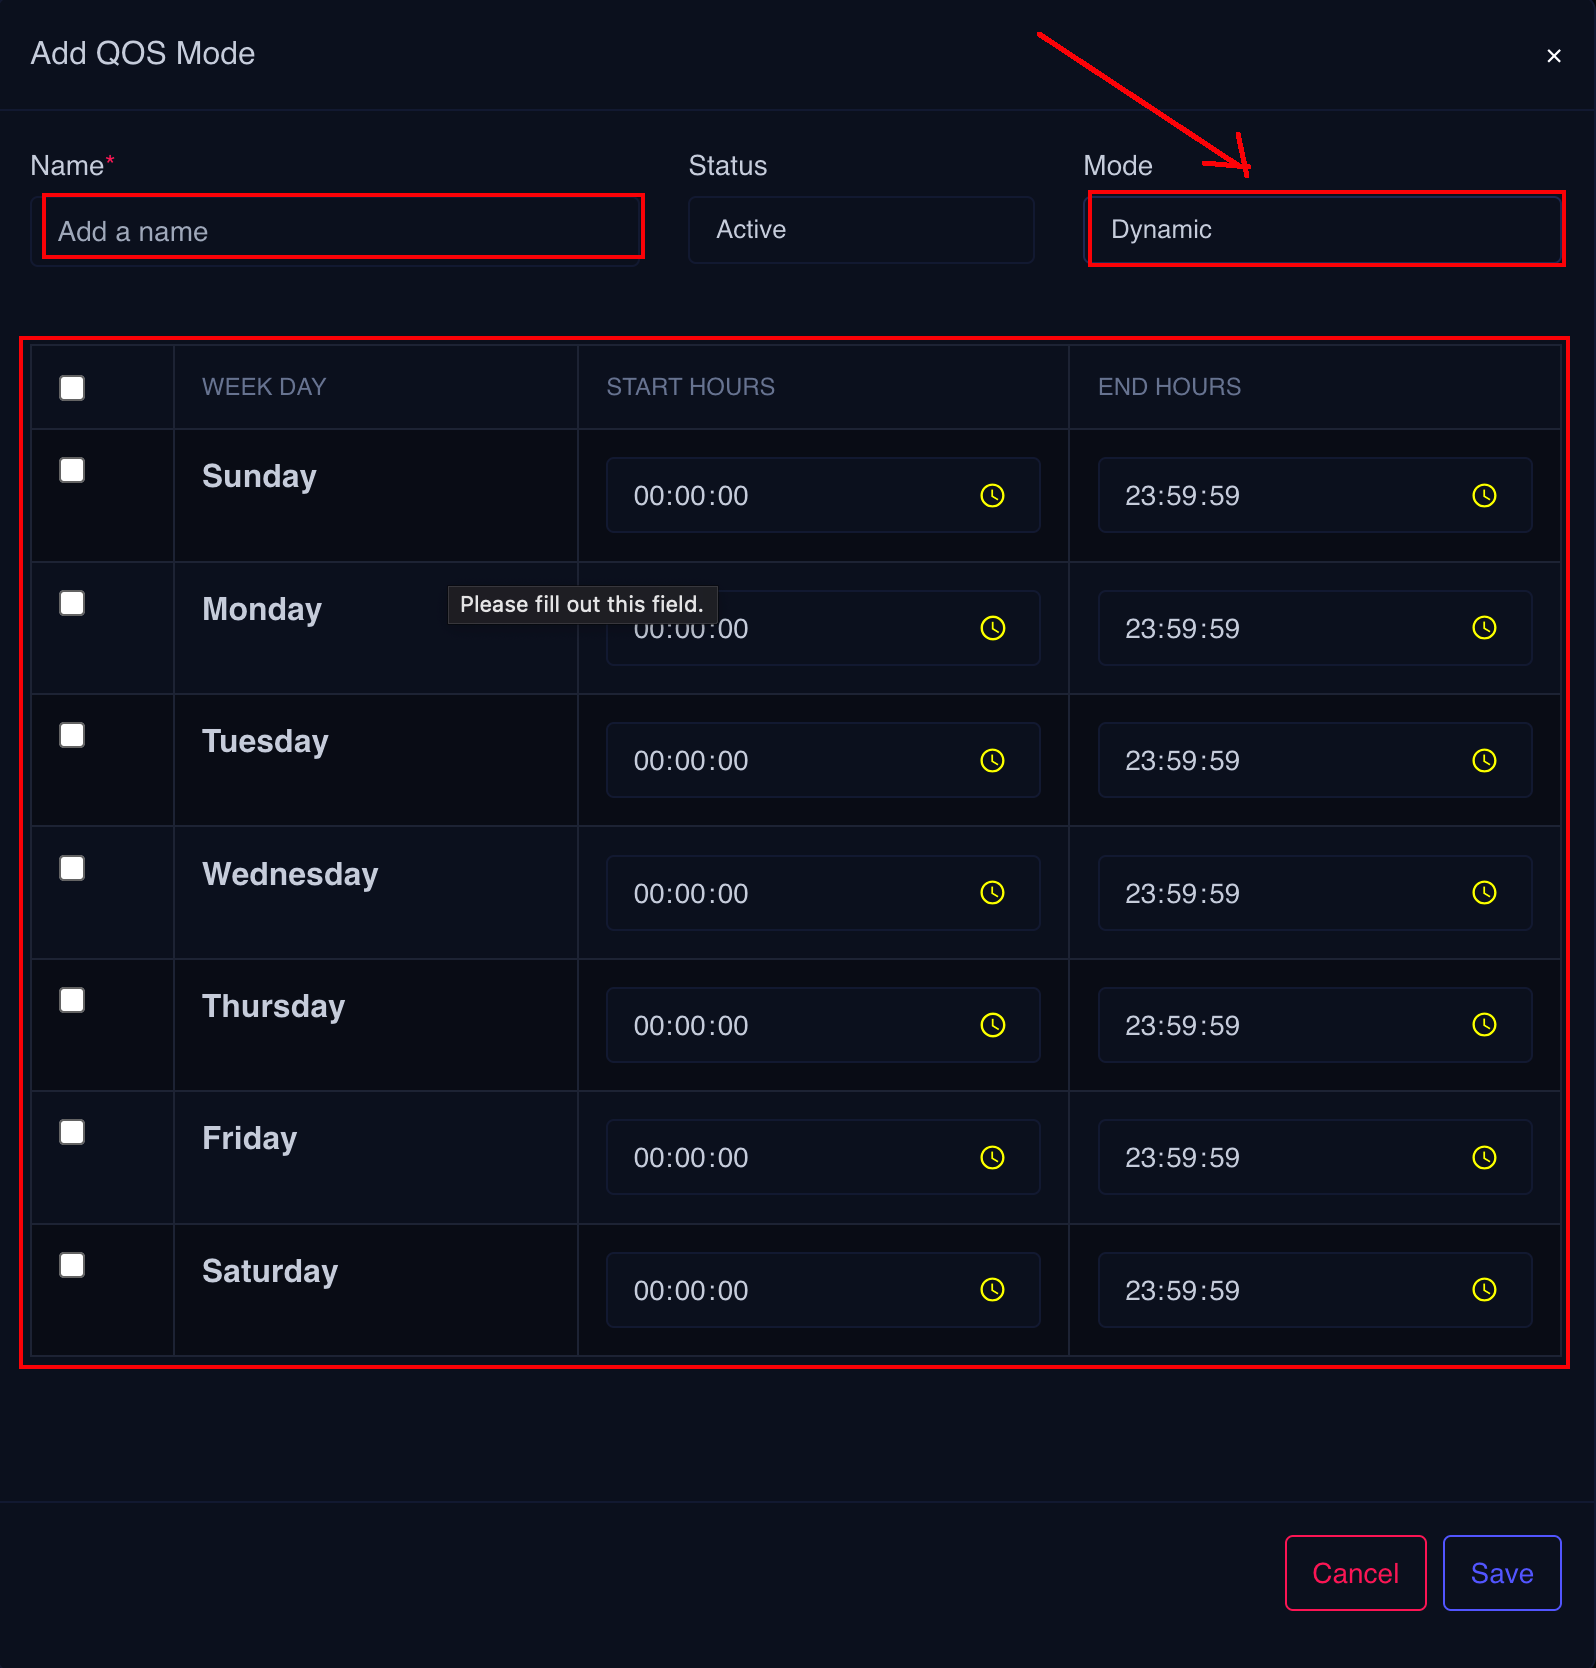
Creating a Dynamic Percentage to Cut
- Click Add under the QoS Modes
- Enter QoS Mode
- Set Mode to Dynamic
- Select the Mode Ratio to Percentage to Cut
- Set plan based on a weekly plan as shown
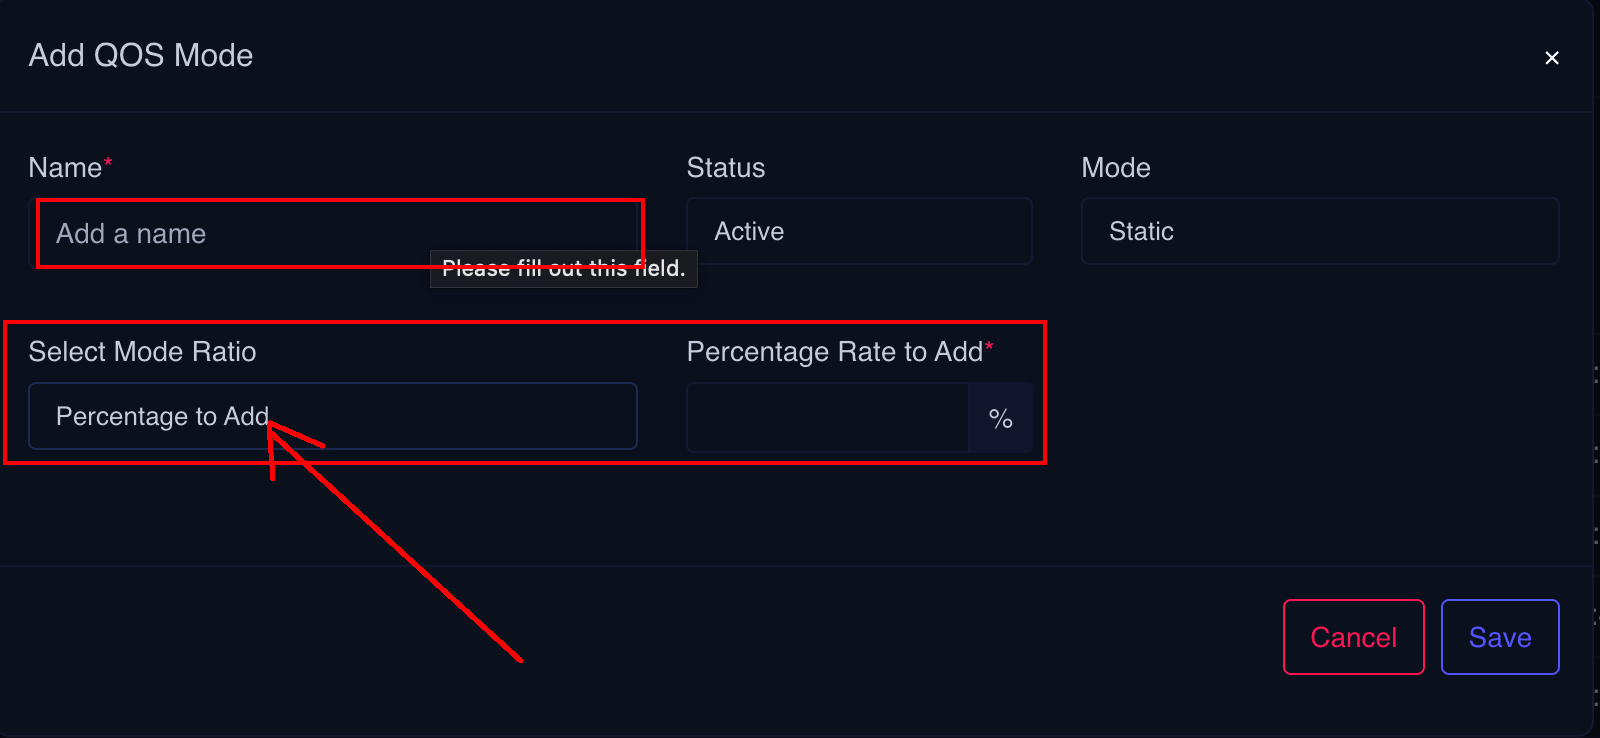
Percentage of Add:
This mode is useful for offering additional data to customers, such as during promotional campaigns or specific periods like weekends. It provides flexibility to allocate extra data based on your design and to enhance customer satisfaction.
Creating a simple Percentage of Add
- Click Add under the QoS Modes
- Enter QoS Mode
- Set Mode to Static
- Select the Mode Ratio to Percentage of Add
Creating a Dynamic Percentage to Cut
- Click Add under the QoS Modes
- Enter QoS Mode
- Set Mode to Dynamic
- Select the Mode Ratio to Percentage of Add
- Set plan based on a weekly plan as shown
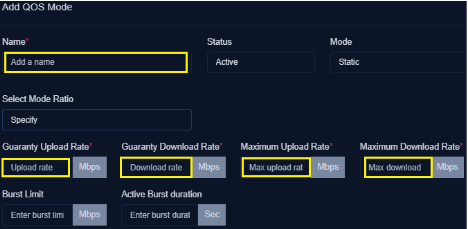
Specify: This mode is closely associated with the Percentage of Add mode. It offers even greater flexibility by allowing you to specify the download and upload data to be added. This customization enables fine-tuning of the QoS settings to meet specific requirements and optimize the user experience.
Creating a simple Percentage of Add
- Click Add under the QoS Modes
- Enter QoS Mode
- Set Mode to Static
- Select the Mode Ratio to Percentage of Add
PON Speed Profiles
PON (Passive Optical Network) Speed Profiles are designed to define and manage the bandwidth allocation for customers connected via fiber-optic networks. These profiles ensure that each user receives the appropriate internet speed based on their subscribed package, optimizing overall network performance and user experience.
PON speed profiles are typically assigned during the provisioning process and can be adjusted as needed to meet customer demands or address specific service requirements. They play a critical role in regulating upload and download speeds, minimizing network congestion, and ensuring fair usage across the network.
These profiles are especially useful for segmenting service tiers (e.g., Basic, Standard, Premium), and serve as a structured solution for delivering consistent, high-quality fiber internet to residential, business, and enterprise users.
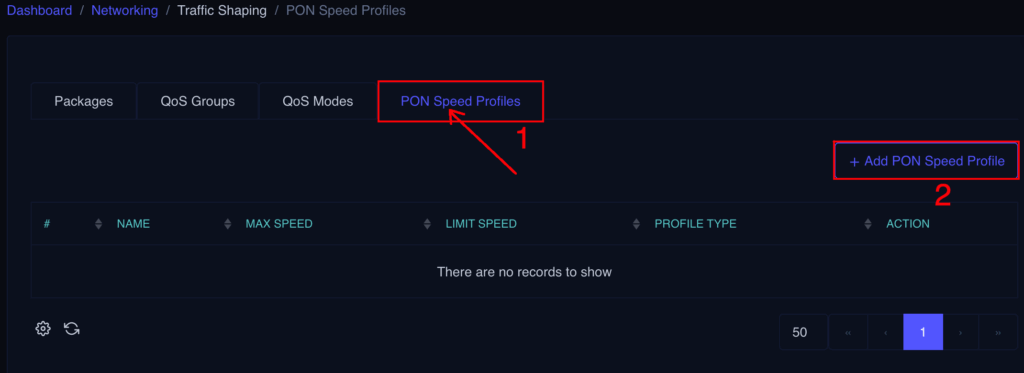
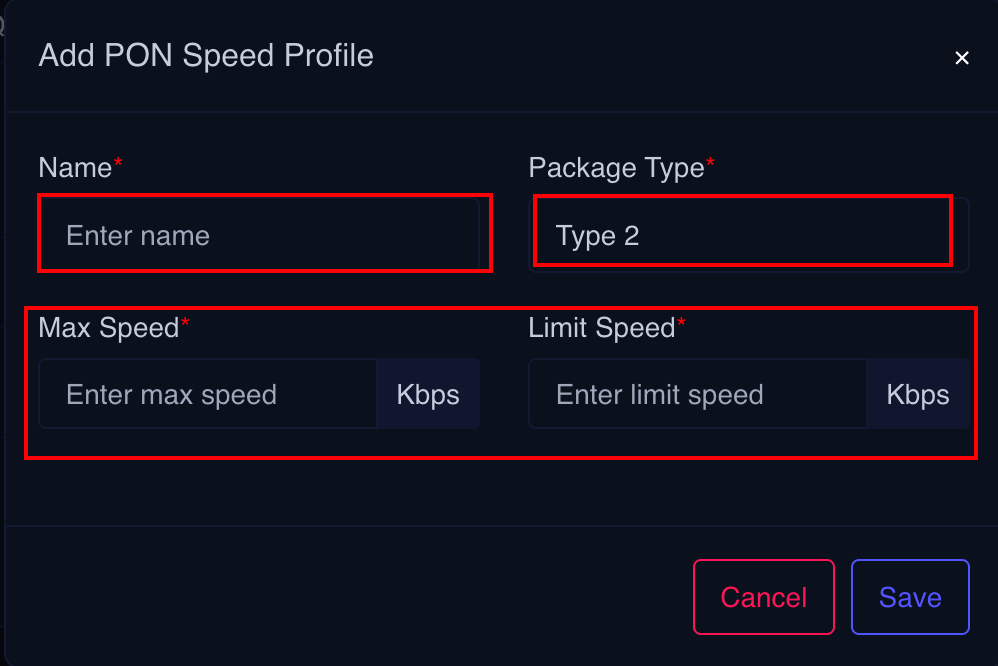
Creating a PON Profile
- Click Add under the PON Profile
- Enter PON Profile Name
- Select Packag Type
- Add Max Speed
- Add Limit Speed