The Hotspot Dashboard is your centralized hub for managing and monitoring your hotspot network’s activity. This intuitive and powerful dashboard provides a comprehensive view of your hotspot infrastructure, enabling you to make informed decisions and optimize your network performance.
Features:
- Real-time Monitoring: Stay updated on the status and performance of your hotspots in real time. Monitor the number of connected users, data usage, and bandwidth consumption to ensure optimal hotspot operation.
- Usage (User) Analytics: Dive deep into detailed usage analytics to gain insights into user behavior, peak usage times, popular locations, and more. Utilize this information to customize your hotspot offerings, enhance the user experience, and maximize customer satisfaction.
- Location Mapping: Visualize the geographical distribution of your hotspots on a map. Identify high-demand areas and optimize hotspot placement to provide smooth coverage and better serve your users.
- Device: Efficiently manage your hotspot devices from a centralized platform. Monitor device configure settings, and perform remote updates to ensure smooth operations across your network.
- Hotspot Subscription Management: Easily manage hotspot subscriptions for your users. Enable onboarding, track subscription details, and facilitate smooth billing processes.
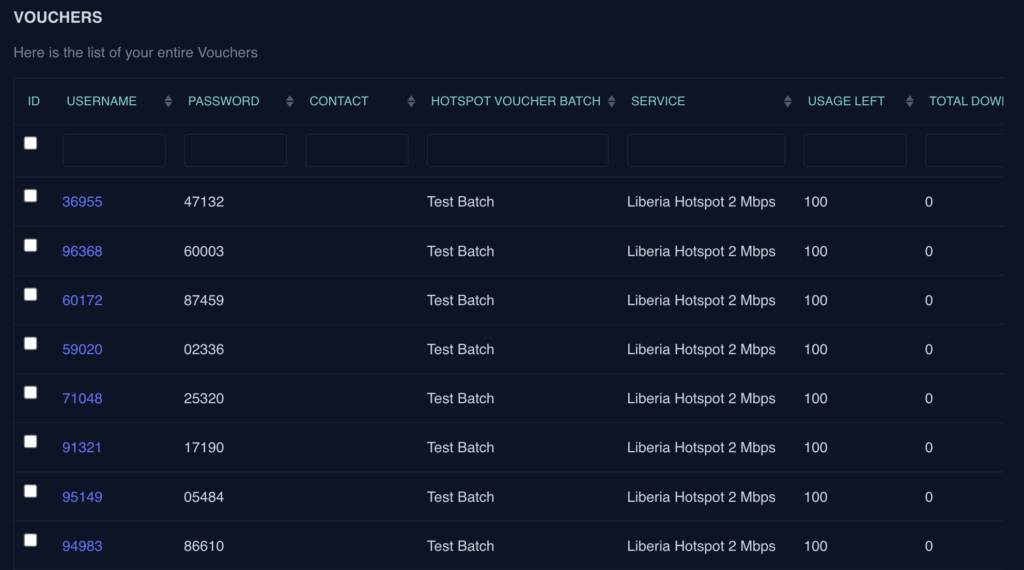
- Vouchers: Generate and manage vouchers for hotspot access. Control access duration, usage limits, and voucher validity to offer flexible options for your users while maintaining security and control.
Hotspot Dashboard explained
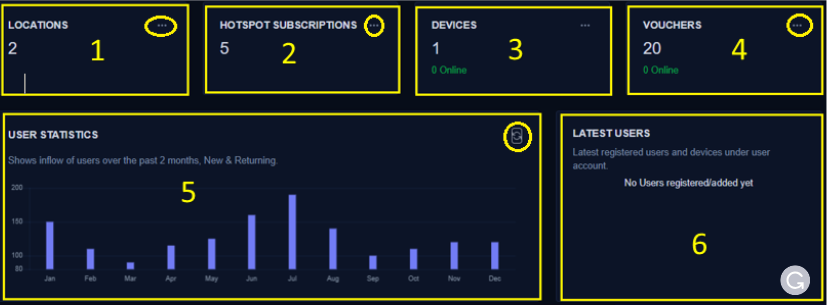
- Shows a summary of all the different Locations where your hotspot service is operational
- Shows a summary of Hotspot Subscriptions
- Shows a summary of all Hotspot Devices online (active) across your network
- Shows a summary of all the vouchers used across the network
- Gives the statistics of hotspot usage across all the users
- Shows the most recent users that were added to the hotspot subscription Circled are three dots to allow you to view
Hotspot Packages Creation
The first step in creating a hotspot is creating a “Package”. The settings related to user speed, download volume, internet sharing method, and other configurations are done in the package module in WISPGate.
From the main menu navigate to:
- Networking
- Traffic Shaping (submenu) then navigate to
- Package tab (as shown below)
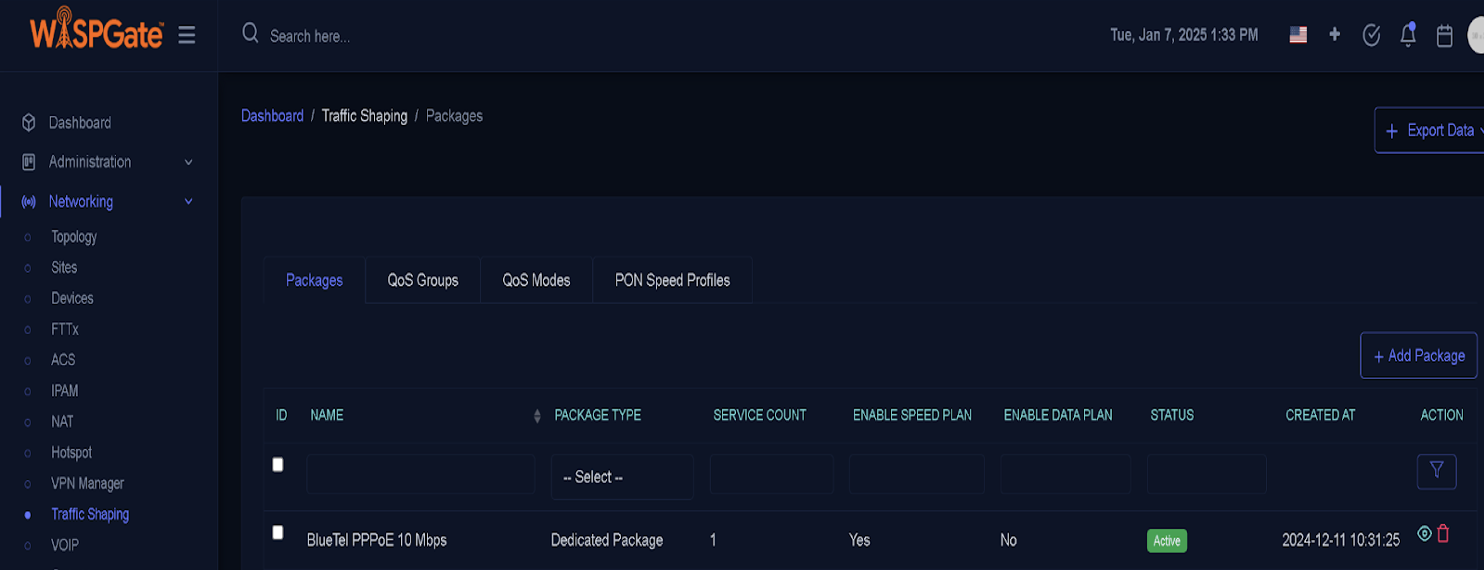
Here, you can see the list of existing packages. You have the option to edit any of them or create a new one. Packages can be utilized across multiple services or tailored specifically for individual services.
Creating specific package(s)
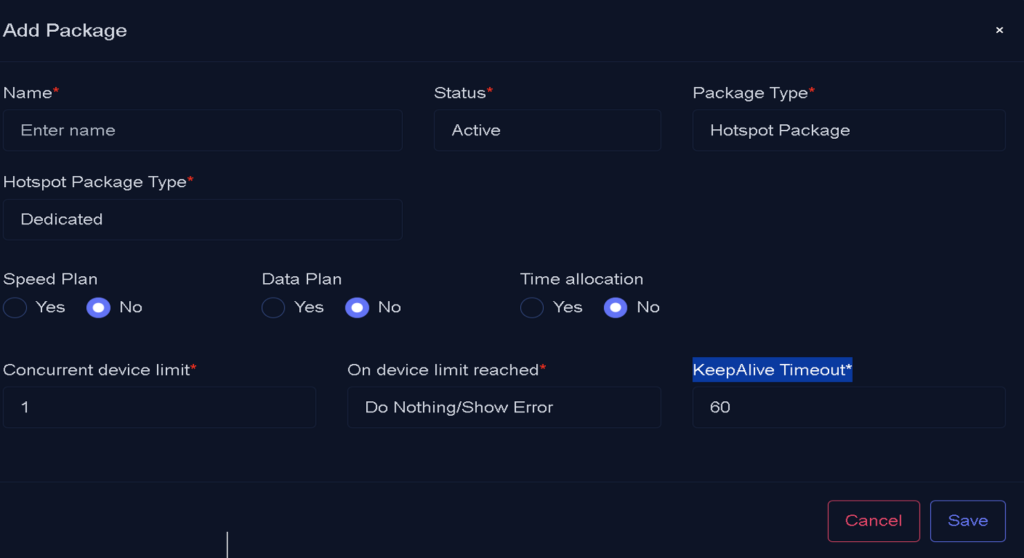
For Hotspot, begin by selecting “Hotspot” as the package type, then configure its options according to the specific service you intend to offer.
Required Options for Configuring a Hotspot Package
Package Name: This value can include letters, characters, and numbers. Choose a name that is easy to identify during subsequent steps. Example: hotspot-10M-20G.
Status:
Package Status: This field is selectable with two options:
- Active: Indicates the package is active and can be used.
- Inactive: Indicates the package is inactive and cannot be selected for a new service.
Package Type:
Package Type: Defines the structure of the package. For Hotspot services, the Hotspot Package type must be selected. Once the Hotspot package type is selected, all fields related to a Hotspot service will become active for configuration.
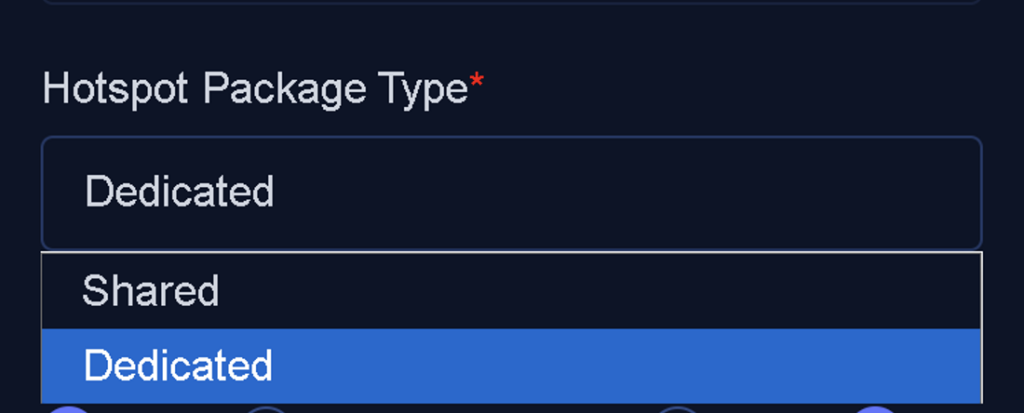
Hotspot Package Type
This is a selectable field with two options:
- Dedicated: The user is allocated the full bandwidth specified in the package.
- Shared: The Auto Sharing Ratio option becomes active, enabling you to input a numerical value that determines how many users will share the allocated bandwidth.
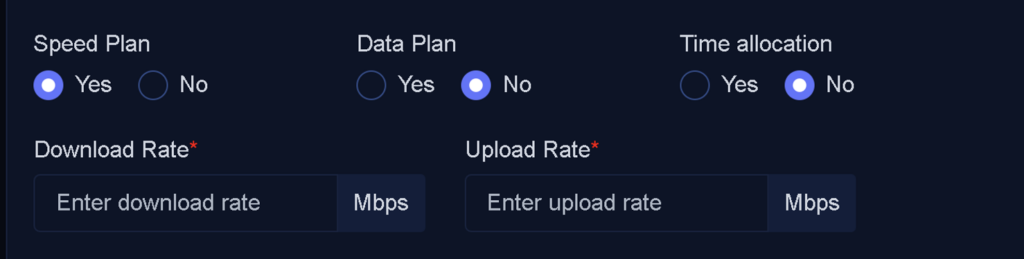
Speed Plan
This field allows you to specify whether speed limitations will be applied to the package:
- No: Users of this package will not have any speed restrictions imposed by Wispgate.
- Yes: Enables you to define speed limits for the user. You can configure both upload and download speeds, specified in megabits per second (Mbps).
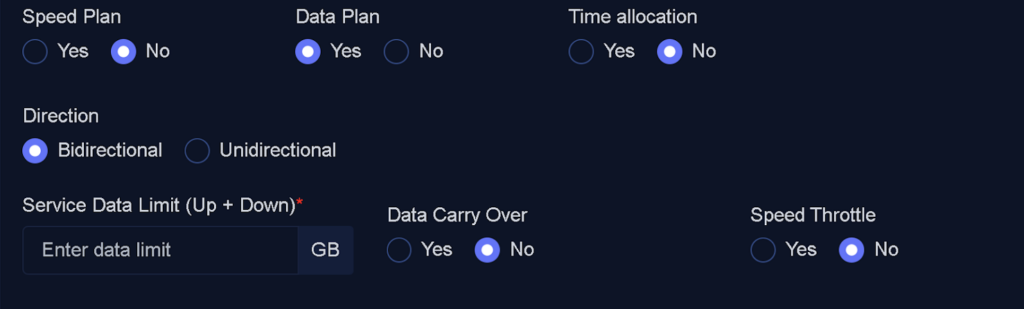
Data Plan
This field allows you to configure data limits for the package:
- No: The package will not have any download or upload limits.
- Yes: Requires you to specify the data limit settings. When configuring the data limit, you must decide how the traffic volume will be calculated:
- Unidirectional: Only download or upload traffic is used for calculation.
- Bidirectional: The combined total of both download and upload traffic is used as the basis for calculation in WispGate.

By selecting Unidirectional, upload and download limits will be entered separately.

This field allows you to specify whether unused data can be transferred to the next period:
- Yes: Any remaining Data volume will carry over to the next billing or usage period.
- No: Unused data will not be transferred and will reset at the start of the new period.
Speed Throttle
This option determines whether users can continue accessing the service at reduced speeds after their data volume is exhausted:
- Yes: Enables throttling. You must specify the upload and download speeds, which will define the reduced speeds at which the user can continue using the service. This ensures service continuity until the end of the active service period.
- No: Throttling is not enabled, and the service will cease functioning once the data volume is exhausted.
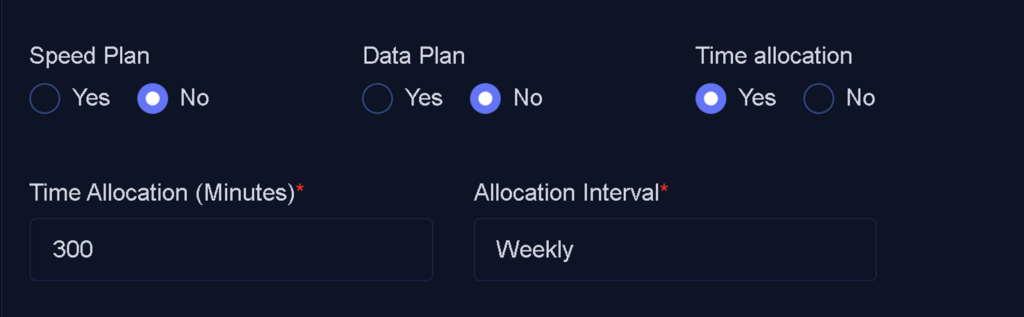
Time Allocation
In Hotspot services, hourly-based plans are commonly offered. By selecting Yes for this option, you can define the allowed usage time within a specific time frame:
- Yes: Allows you to set the usage time in minutes. This can be used for time-limited packages, such as a 5-hour plan valid for one week.
- No: Time allocation is not applicable, and the package will not have a set usage time limit
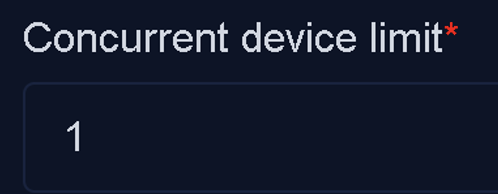
Concurrent Device Limit: This field defines the maximum number of devices that can simultaneously use the same username to access the service.
KeepAlive Timeout
This field specifies the duration a user remains online in WispGate after disconnecting from the hotspot. During this time, the user can reconnect without having to re-enter their username and password.

The KeepAlive Timeout setting allows for a smooth reconnection experience, reducing the need for frequent authentication when the user reconnects within the specified time frame.
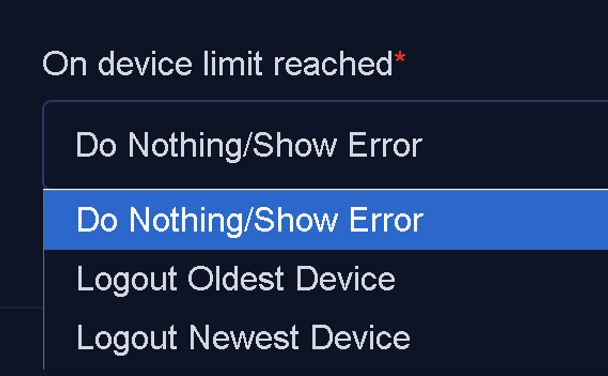
On Device Limit Reached: This field defines WispGate’s behavior when a username has already reached the maximum number of allowed online devices, as specified by the Concurrent Device Limit, and a new device attempts to connect.
Creating a Service
After creating the package, follow these steps to create a service and attach the package to it:
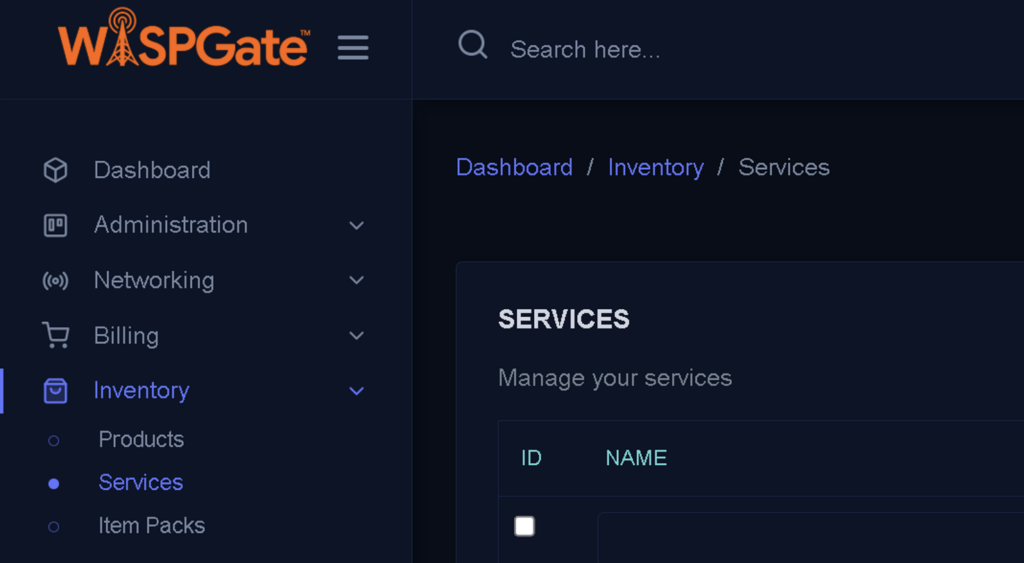
Go to the Main Menu and select
- Inventory.
- Service
- In this section, you can either create a new service or modify any existing services.
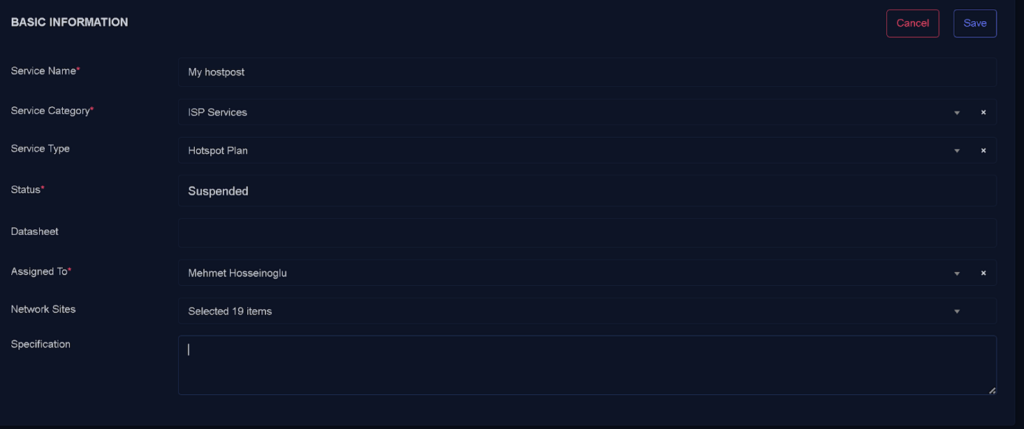
Creating a Hotspot Service
- Service Name
- Enter a desired name for your service. This is the name that customers will see when purchasing the Hotspot service.
- Service Category To create a Hotspot service, select ISP Service as the service category.
- Service Type After selecting the service category as ISP Service, the Service Type field becomes active. Set the value of this field to Hotspot Plan.
- Status This field determines the current status of the service:
- Active: Indicates the service is currently active.
- Inactive: Indicates the service is not active. Other status options may be available depending on your requirements.
- Assigned To This field defines which user or role has permission to manage or create the service.
Network Sites
Specify which network sites this service will be active for. You can select the sites that will use this service.
If no network has been created yet, please refer to the Network Sites section and follow the steps to create one before continuing with this process.
- Specification If the service requires additional details or specifications, include them in this section. This is where you can provide any important information related to the service.
Hotspot Service Assignment
Hotspot services under subscription allow Internet Service Providers (ISPs) to enable users to access high-speed Internet in public or private locations via Wi-Fi. in other words, it’s all about assigning the previously created Hotspot Package/Service to a Subscriber. These services provide convenient and secure connectivity in areas such as cafes, airports, hotels, and businesses. ISPs configure and manage hotspots, ensuring smooth connection, authentication, and data encryption. By offering hotspot services, ISPs enhance customer experience, expand coverage, and enable users to stay connected while on the go, providing both free and paid options depending on the provider’s model.
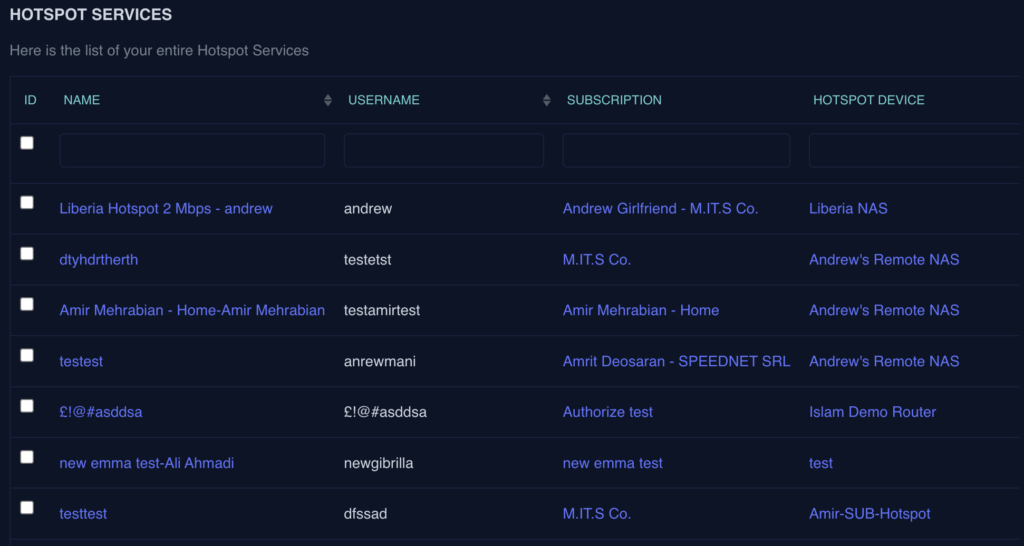
To Assign a Hotspot Service:
- Navigate to Administration
- Select Hotspot Service
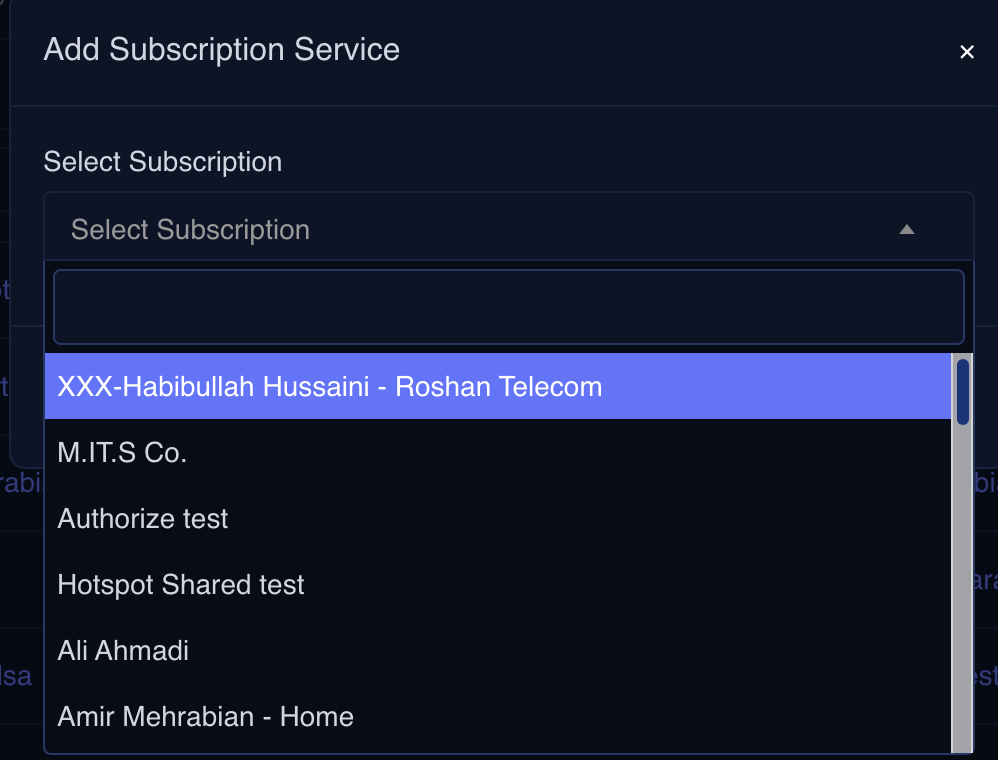
- Click the Add Hotspot service button to a new Hotspot service
- Select a Subscription (Note: The Prerequisite for creating a Hotspot service is a subscription)
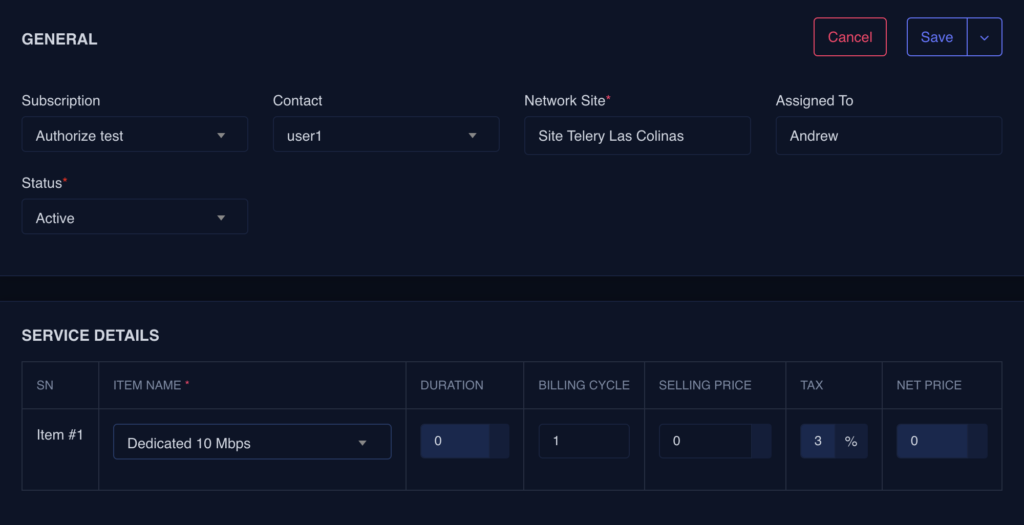
BASIC INFORMATION
- Select the contact
- Select the associated Network site
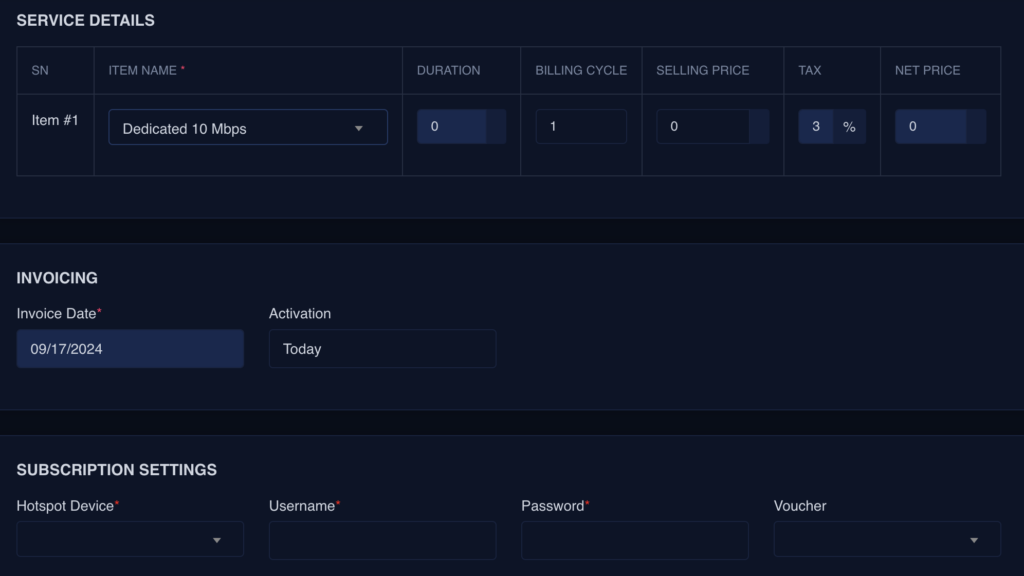
- Select Details
- Select Device
- Username
- Password
- other settings if require
Router Configuration
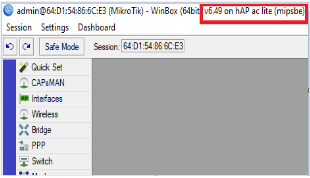
Step One: Router’s Examination This step requires that your Mikrotik Router is running the latest version (make sure that all packages are updated to the latest version from the Mikrotik website (https://www.mikrotik.com)
At the time of preparation of this Users’ Guide, the latest package is v6.49. Please check the Mikrotik website to see the latest package for your router. You can also manually upgrade the router as shown below.
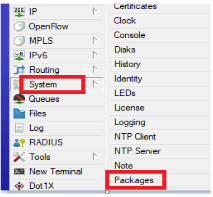
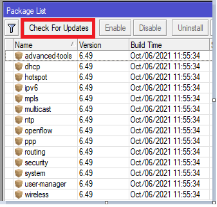
From the System tab, locate and click the “Packages
Click the “Check for updates” If there is any update at the of configuration, the router will prompt you to down and install.
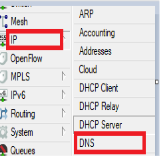
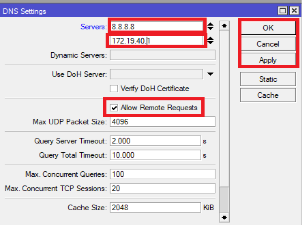
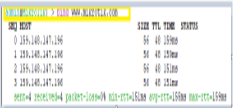
Step Two: Internet Connectivity Make sure the Router has an Internet connection and can ping 8.8.8.8 and www.mikrotik.com Set the Parent DNS to 8.8.8.8 and check the “Allow Remote Request” Make sure NAT is functioning and all routes are reachable.
Ping from MikroTik (www.mikrotik.com)
Apply and OK once done entering the DNS
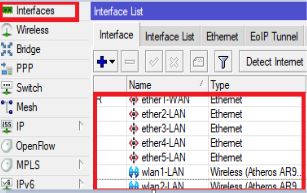
Step Three: Interfaces and Bridging Best Practice, configure a LAN bridge in the router and add all the interfaces to that bridge except for the Port feeding the router with the internet. For this configuration, we set Ethe1 as WAN and the other interfaces as LAN
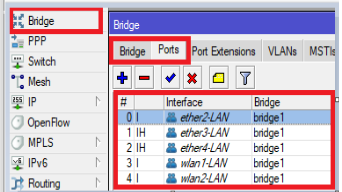
Hover the cursor to the bridge tab, create a bridge, and add all ports to that bridge. For this scenario, the bridge is named bridge1
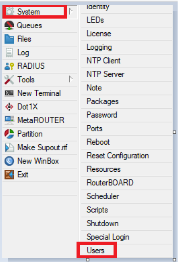
Step Four: Username and Password Create a unique user and password that will be used on the portal. Make sure that the User has full permission. However, the default admin on the Router is still a better option. In this scenario. We create a username “wispgate” with the password “admin@password” Click the System Tab, then locate Users.
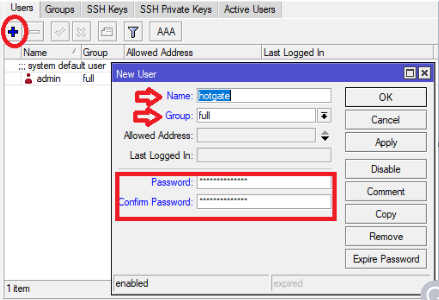
Click OK to Save
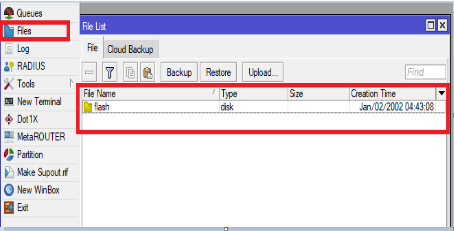
Step Five: HotGate Files and cmds When you request to use ourHotGate product or test the product, a configuration package will be sent to you, or our technical executives will connect to your system via VPN, TeamViewer (TV), Anydesk, etc. to execute the setup. A specific HotGate Folder is dragged to the router under flash in the instance that the Router has a Flash. See the steps below.

Drag the Hotspot Foldas under the Flash in the Router
Replace all the text colored in red with the credentials from the portal. Make the user keep the quotation marks and don’t leave space(s).
Consider the following: VPN Username (in red) – replace with the username from Location on the portal VPN Password (in red) – replace with the password from Location on the portal Hotspot Identity (in red) – replace with the unique Location ID as indicated on the portal (e.g: airport-city) reseller name (in red) – If you are a reseller just enter your company name or any default name interface (in red) – specify the interface from the router. For our scenario, it is (bridge1) Reseller Phone Number – include a phone number with country code.
Copy the entire cmds beginning at # VPN Credential variables and ending at address! src-address-list… Paste it in the terminal window of your Mikrotik Router. Closely observe to see that the configuration cmds you pasted in the terminal do not give any error. If an error will come up, please troubleshoot the following area: That the user you are using has full permission That the router is upgraded to the latest version That you copied all the required cmds before pasting them to the terminal. All quotation marks are in tight where available in the config. Cmd.
It’s called “Fill up the Reds”
VPN Credential variables
:global vpnserver1 “138.201.248.206” :global vpnusername “username from the portal comes here in this double quote” :global vpnpassword “password from the portal comes here in this double quote” :global vpnenabled “yes” :if ($vpnusername = “\3Cvpn_username\3E” || $vpnpassword = “\3Cvpn_password\3E”) do={:set $vpnenabled “no”}
Variables for Hotspot Server
:global hotspotserveridentity “Location ID” :global logindomain “cp-redirect.hotgate.io” :global logoutdomain “cp-redirect.hotgate.io” :global resellername “Company’s Name” :global hotspotdomain “captive.hotgate.io” :global resellercolour “FD7D00” :global resellerphonenumber “Your Phone number here with country code”
Variables for Radius
:global radiussecret “mitserver@4400”
Variables for DHCP
:global hsinterface “interface name that the hotspot will be running on: e.g: bridge1” :global dhcpdomain “hotspotlogin.services”
Importing Certificates (Make sure router is with or without flash folder)
/certificate import file-name=flash/certificate-name
import file-name=flash/key-name import file-name=flash/certificate-name
Adding open vpn client and server route
:if (vpnenabled = “yes”) do={ /interface ovpn-client add cipher=aes256 connect-to=”vpnserver1″ name=Hotgate-OVPN password=vpnpassworduser=vpnpassworduser=vpnusername certificate=none port=1194 mode=ip }
Configure DHCP Interface to IP address
/ip address add address=10.0.0.1/22 interface=“$hsinterface” comment=“Hotspot network gateway”
Adding DHCP Server and address pool
/ip pool add name=“hotgate-pool” ranges=10.0.0.2-10.0.3.254 /ip dhcp-server add name=“hotgate-dhcp” interface=“hsinterface”lease−time=1haddress−pool=hotgate−poolbootp−support=staticauthoritative=yesdisabled=no/ipdhcp−serverconfigsetstore−leases−disk=5m/ipdhcp−servernetworkaddaddress=10.0.0.0/22gateway=10.0.0.1dns−server=10.0.0.1domain=”hsinterface“lease−time=1haddress−pool=hotgate−poolbootp−support=staticauthoritative=yesdisabled=no/ipdhcp−serverconfigsetstore−leases−disk=5m/ipdhcp−servernetworkaddaddress=10.0.0.0/22gateway=10.0.0.1dns−server=10.0.0.1domain=”dhcpdomain”
Replace all the text colored in red with the credentials from the portal. Make the user keep the quotation marks and don’t leave space(s).
Consider the following: VPN Username (in red) – replace with the username from Location on the portal VPN Password (in red) – replace with the password from Location on the portal Hotspot Identity (in red) – replace with the unique Location ID as indicated on the portal (e.g: airport-city) reseller name (in red) – If you are a reseller just enter your company name or any default name interface (in red) – specify the interface from the router. For our scenario it is (bridge1) Reseller Phone Number – include a phone number with country code.
Copy the entire cmds beginning at # VPN Credential variables and ending at address! src-address-list… Paste it in the terminal window of your Mikrotik Router. Closely observe to see that the configuration cmds you pasted in the terminal do not give any error. If an error will come up, please troubleshoot the following area: That the user you are using has full permission That the router is upgraded to the latest version That you copied all the required cmds before pasting them to the terminal. All quotation marks are in tight where available in the config. Cmd.
It’s called “Fill up the reds”
VPN Credential variables
:global vpnserver1 “138.201.248.206” :global vpnusername “username from the portal comes here in this double quote” :global vpnpassword “password from the portal comes here in this double quote” :global vpnenabled “yes” :if ($vpnusername = “\3Cvpn_username\3E” || $vpnpassword = “\3Cvpn_password\3E”) do={:set $vpnenabled “no”}
Variables for Hotspot Server
:global hotspotserveridentity “Location ID” :global logindomain “cp-redirect.hotgate.io” :global logoutdomain “cp-redirect.hotgate.io” :global resellername “Company’s Name” :global hotspotdomain “captive.hotgate.io” :global resellercolour “FD7D00” :global resellerphonenumber “Your Phone number here with country code”
Variables for Radius
:global radiussecret “mitserver@4400”
Variables for DHCP
:global hsinterface “interface name that the hotspot will be running on: e.g: bridge1” :global dhcpdomain “hotspotlogin.services”
Importing Certificates (Make sure router is with or without flash folder)
/certificate import file-name=flash/certificate-name
import file-name=flash/key-name import file-name=flash/certificate-name
Adding open vpn client and server route
:if (vpnenabled = “yes”) do={ /interface ovpn-client add cipher=aes256 connect-to=”vpnserver1″ name=Hotgate-OVPN password=vpnpassworduser=vpnpassworduser=vpnusername certificate=none port=1194 mode=ip }
Configure DHCP Interface to IP address
/ip address add address=10.0.0.1/22 interface=“$hsinterface” comment=“Hotspot network gateway”
Adding DHCP Server and address pool
/ip pool add name=“hotgate-pool” ranges=10.0.0.2-10.0.3.254 /ip dhcp-server add name=“hotgate-dhcp” interface=“hsinterface”lease−time=1haddress−pool=hotgate−poolbootp−support=staticauthoritative=yesdisabled=no/ipdhcp−serverconfigsetstore−leases−disk=5m/ipdhcp−servernetworkaddaddress=10.0.0.0/22gateway=10.0.0.1dns−server=10.0.0.1domain=”hsinterface“lease−time=1haddress−pool=hotgate−poolbootp−support=staticauthoritative=yesdisabled=no/ipdhcp−serverconfigsetstore−leases−disk=5m/ipdhcp−servernetworkaddaddress=10.0.0.0/22gateway=10.0.0.1dns−server=10.0.0.1domain=”dhcpdomain”
Go to the IP Address Tab in the Router
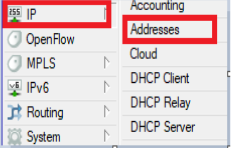
Ensure it shows as below:
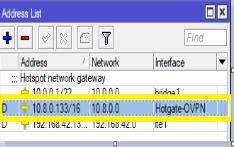
As shown above, copy the IP Address of the Hotgate-OVPN and paste it into the Portal as shown below. Please note that the IP address is not added to the Portal with the CIDR /16. For this scenario, the IP address is 10.8.0.133.
Hotspot Login Page Designing
WISPGate allows the creation of customized hotspot pages that can be designed and deployed at preferred locations. Two primary types of pages can be created for users:
- Login Page: The Login Page is designed to authenticate users by requiring their credentials, such as a username and password, or through alternative methods like voucher codes or social media logins. This page ensures secure access to the network and can be customized to align with your brand’s design and user preferences.
- Registration Page: The Registration Page allows new users to sign up and gain access to the hotspot service. It typically collects essential information, such as name, email, phone number, and other relevant details. This page can be tailored to comply with specific requirements, such as enabling user verification or integrating with customer databases for smooth data management.
Designing a Login Page
When you click the “Save” button, the browser refreshes the page but does not exit the Page Designer. While remaining on this page, scroll down to Design Pages.
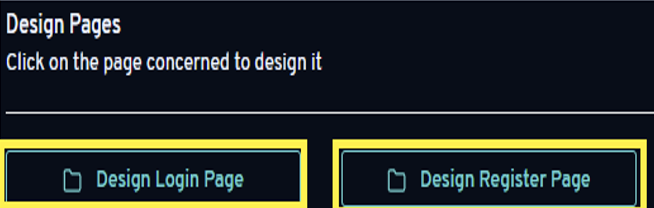
Click Design Login Page to structure the page according to your preferences
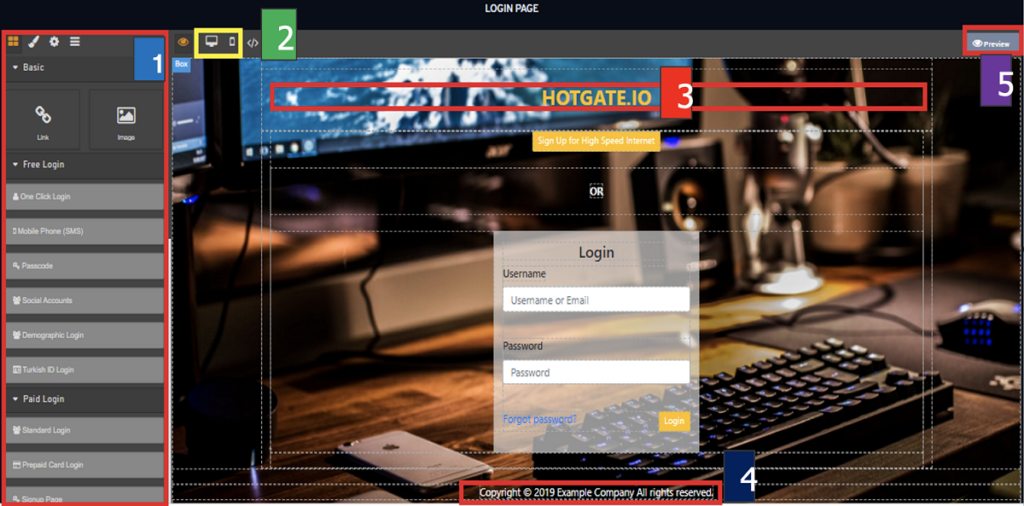
As shown in the image above:
- Area Marked 1: This section consists of features that allow you to design the page according to your preferences.
- Area Marked 2: This section displays a preview of how the page will appear on a computer or mobile phone.
- Area Marked 3: Replace HOTGATE.IO with a location name or any text that suits your needs.
- Area Marked 4: Replace Example Company with your company’s name and update the year to the current one, if necessary.
- Area Marked 5: This section shows a preview of the Login Page. Once satisfied with the design, click Save
Next, hover over and navigate to the Design Page section, then click on Design Registration Page.
Similar to the Login Page, apply the same principles to customize the Registration Page according to your requirements. Note: Ensure you save the page after completing the modifications.
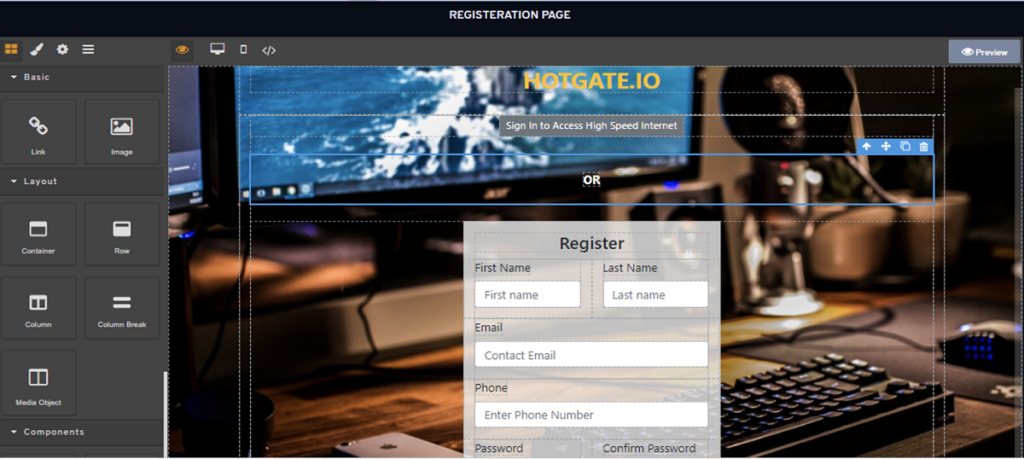
Click save to save the Page. Repeat the same steps to create multiple pages
Voucher Batch
Hotspot vouchers are prepaid codes that allow your clients to access Wi-Fi services in public or private areas. These vouchers are typically issued by businesses that offer flexible internet access for a defined duration or data limit. Users can purchase vouchers in different denominations based on their needs, ranging from hourly, daily, weekly to monthly access.
Benefits:
- Convenient Access: Users can easily connect to Wi-Fi by entering the voucher code on the login page.
- Flexible Plans: Vouchers cater to different usage needs, from short-term browsing to extended internet sessions.
- Prepaid & Secure: Users pay upfront, avoiding recurring bills, and enjoy secure, encrypted access.
- No Contract Required: Vouchers provide internet access without the need for long-term subscriptions. Hotspot vouchers are ideal for businesses offering Wi-Fi to customers (e.g., cafes, hotels, or event venues) or ISPs looking to expand their services in public areas.