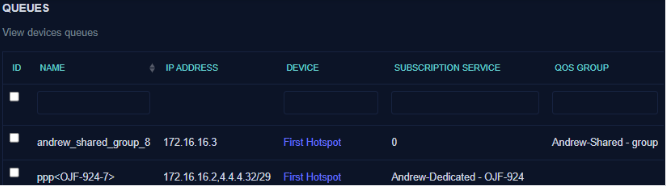
The Queues module displays all the packages (queues) that have been created within your network. This module provides a comprehensive view of these packages, allowing you to easily manage and synchronize them as needed. You can conveniently access and review all the packages in this module, making it easy to make any necessary adjustments or modifications. Associated IPs, Devices, Subscription Services, and QoS groups are all displayed here
Billing Module
The Billing module is a crucial component of the WISPGate software, designed to streamline and manage the financial aspects of your business. It integrates smoothly with various sub-modules, including Service Contracts, Quotes, Invoices, Purchase Orders, Asset Orders, and Price Books. Let’s take a closer look at each of these sub-modules and the functionalities they offer:
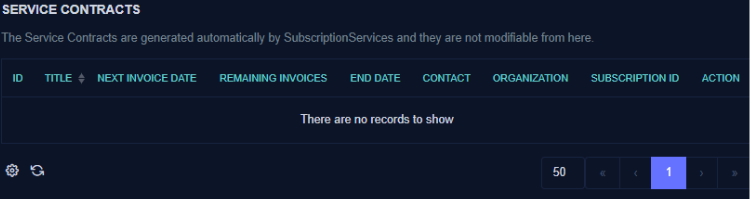
Service Contracts:
Within the Service Contracts section, you can conveniently view and manage the various service contracts established with your customers. This section enables you to effectively handle and maintain service agreements with your valued clientele (contract Create and renew contracts).
Quotes:
The Quotes module offers the ability to create and manage all quotations for products and services, including the following:
- Quote Creation: Easily generate professional and detailed quotes for customers.
- Product Catalog: Access an extensive catalog of products and services to include in quotes.
- Quote Approval Workflow: Define an approval process to ensure accuracy and consistency.
Creating Quotations:
- Navigate to Billing
- Click the Add Quotes
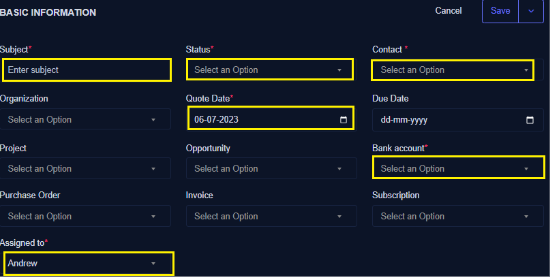
BASIC INFORMATION
- Enter the subject of the Quote
- Select Status
- Create Invoice = a credit invoice status, also referred to as a credit note or credit memo, is a quotation issued by you to your customer. Its purpose is to recognize a decrease in the amount owed for goods or services that were previously invoiced. Essentially, it functions as a negative invoice that indicates the possibility of a credit or refund being due to the customer.
- Overdue Status = An overdue quote refers to a quotation that has surpassed its designated expiration or validity date without being accepted or acted upon by the customer. It signifies that the recipient of the quote has not responded within the specified timeframe or has not taken any further action, such as approving or converting the quote into an order.
- Partially Paid status = is a quote that has received a partial payment, indicating that the customer has made a payment towards the total amount due, but there is still an outstanding balance remaining. This status helps track the progress of payment collection and highlights invoices that require further attention.
- Paid (closed state) status = The “Paid” status signifies that an invoice has been fully settled, indicating that the customer has successfully made the full payment for the invoiced amount. This status confirms the completion of the payment process and the satisfaction of the financial obligation, marking the state as closed.
- Refund status = indicates the completion of a transaction where the customer has received a reimbursement for a previously made payment. It represents the closure of the refund process and the resolution of the customer’s financial claim.
- The status of Cancelled represents the conclusion of a transaction before its fulfillment or completion. It signifies the termination of an order, service, or agreement between the seller and the customer, resulting in the voiding of any related obligations or commitments.
Creating a simple quote:
- Navigate to Billing
- Select Quote
- Click the Add Quote button
- Enter all Basic Information
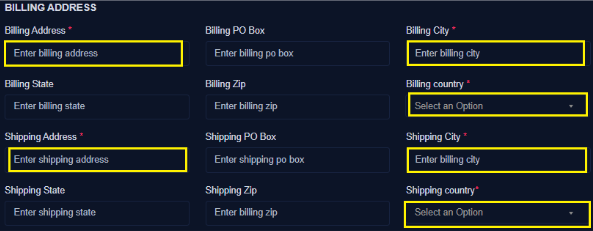
Add mandatory mailing address information
- Add description of the quote (not mandatory)
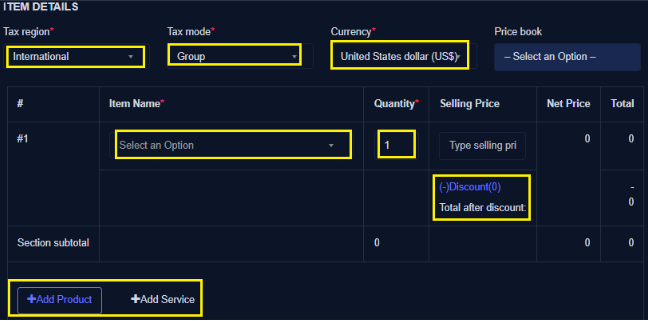
- Select your Tax Region
- Select Tax Mode
- Choose Currency
- Under Item Name, select preferred item (option)
- Enter quantity
- Enter discount if any
- Add additional Products or Services
- Ensure that Net prices and total are both calculated automatically.
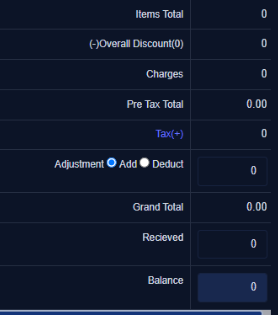
Overall total and charges are displayed as shown below.
Invoices
The Invoice module in WISPGate is a robust feature designed to streamline and automate your billing process. With this module, you can effortlessly generate professional invoices, track payments, manage balances, and oversee associated bank accounts, resulting in enhanced financial transaction management. Its user-friendly interface ensures a simplified experience, freeing up your time and energy to focus on other areas of business growth.
By utilizing the Invoice module, you can impress your customers with clear and itemized invoices that promote transparency. Additionally, customers have the flexibility to receive their invoices through SMS and/or email, catering to their preferred communication method. Furthermore, the module provides real-time data and analytics, enabling you to gain valuable insights into your invoicing and financial performance, and facilitating informed decision-making.
Creating an Invoice:
- Navigate to Billing
- Select Invoice
- Click the Add Invoice button
- Fields with an asterisk(*) are mandatory
Basic Information:
- Enter Invoice name
- Invoice status is auto-generated (marked as created)
- Select the specific Contact
- Select associated Organization
- Enter Invoice date
- Choose desire notification type

- Enter Invoice Due Date
- Select Project (often auto-generated)
- Select Opportunity (often auto-generated)
- Select desired Print Template
- Select the Bank account to bill
- Assign Invoice to
ITEMS DETAILS
- Select Tax Region
- Choose Tax Mode
- Select Currency Type
- Choose Prince Book
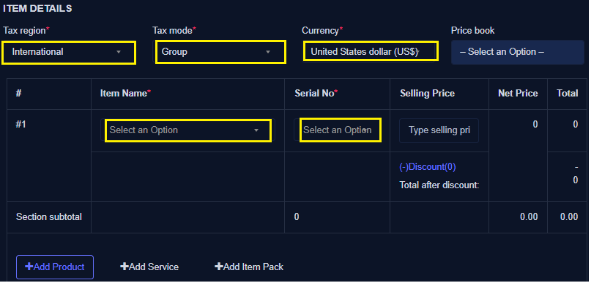
- Select Item Name
- Select Item Serial No.
- Enter Selling Price (Net Price & Total are auto-generated)
- Add Discount (keep in mind that discount changes the total price)
- Sub-total appears under each section
- To add more details to the invoice, by clicking Add Products, Add Service, or the Add Item Pack. Item-Pack as the name suggests, consists of a pack of Items.
Total
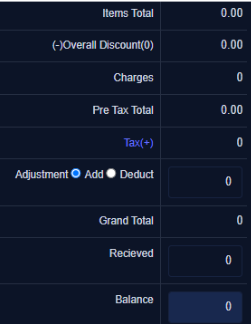
- All item totals, other charges, Grand Total, Received Revenue, and Balances are displayed.
- Make sure to add Taxes if necessary (Keep in mind that adding Taxes affects the grand total of the invoices)
- Select a Term & Condition if applicable
- Add Description if applicable
- Ensure all fields are filled (mandatory where applicable), then Save